Sequences
An email sequence (also known as a campaign) is a series of pre-scheduled emails designed to guide recipients through a specific journey, whether it’s welcoming new subscribers, promoting a product, or re-engaging inactive customers.
By strategically planning each email, you can provide valuable content, build trust, and encourage actions that align with your business goals.
This feature is currently in beta, which means you may encounter bugs. Please report them in our Discord group if you run into any issues.
Before you start: If your school is hosted on courselit.app, you need to get approved to send marketing emails. Request access here.
Sequences Hub
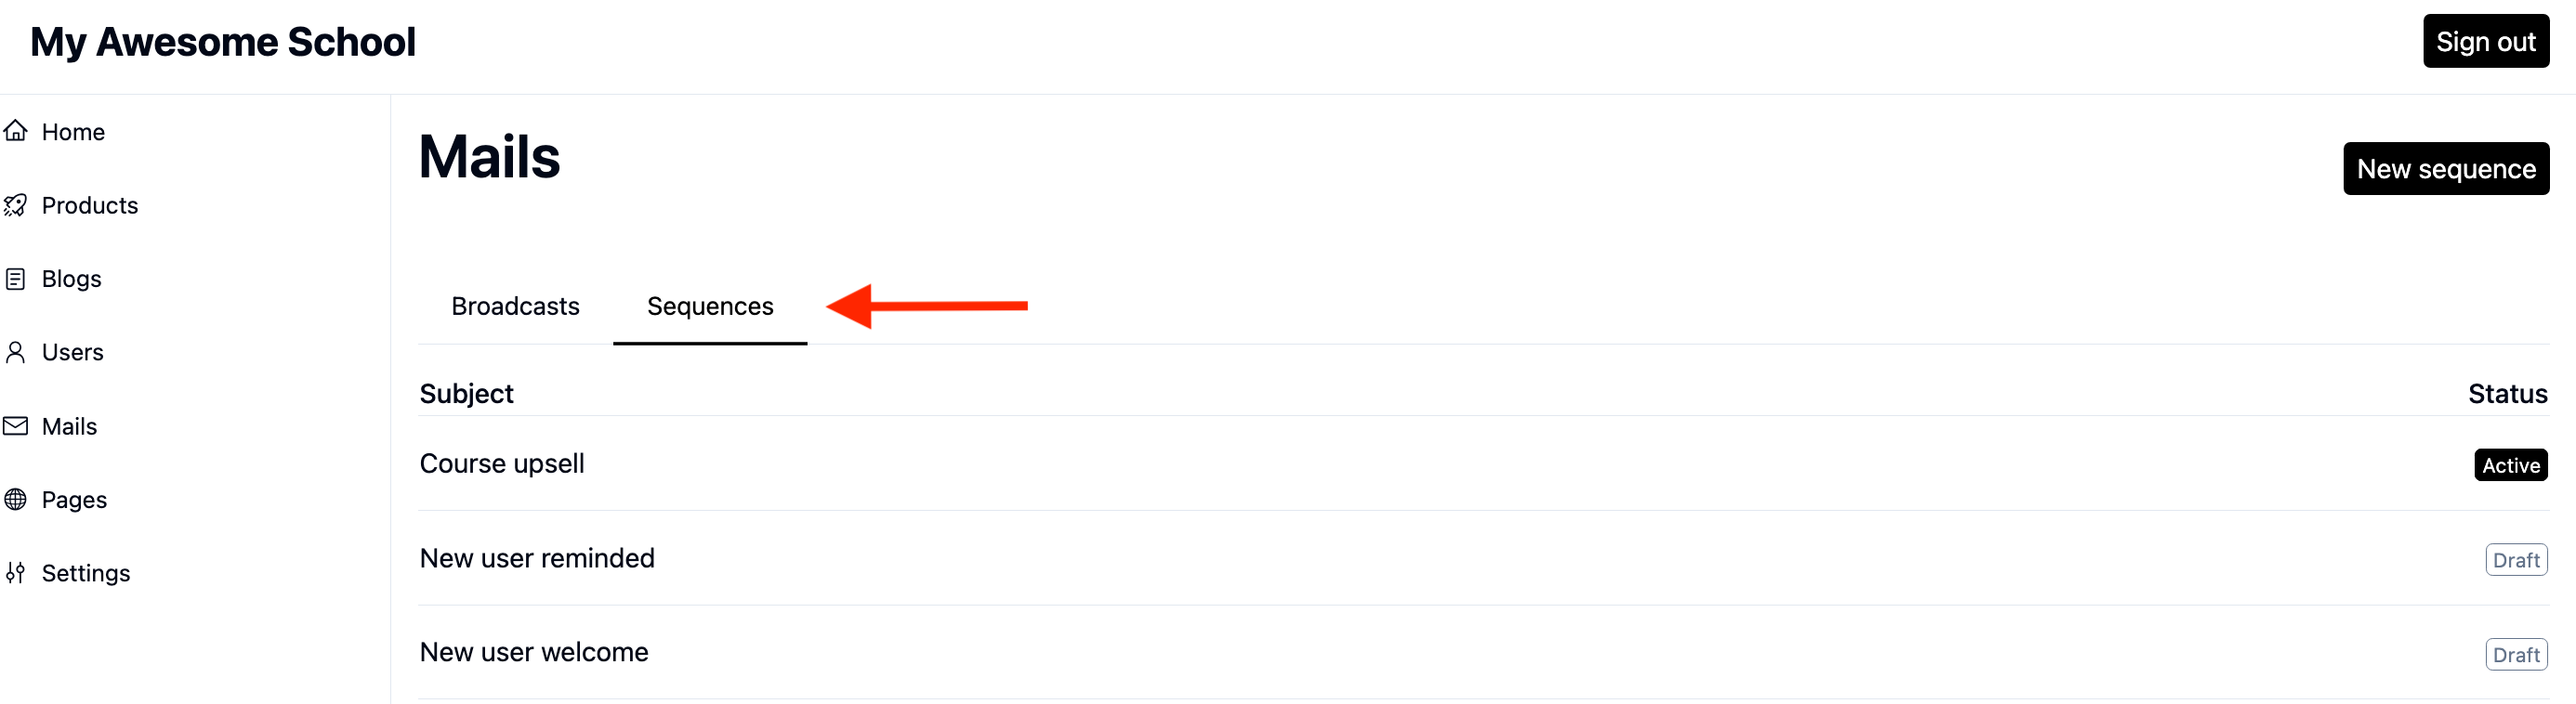
From the Dashboard, go to Mails to land on the Broadcasts hub. The Sequences tab is located to the right of it.
Here, you will see all the sequences you have configured.
Compose a Sequence
- Click the
New sequencebutton on the right, in theSequenceshub.
You will be redirected to the sequence compose screen. The active tab will be Compose.
-
You will see a template selection screen. Click the template you’d like to use as a starting point. After selecting it, You will be redirected to the sequence management screen. The active tab will be
Compose. -
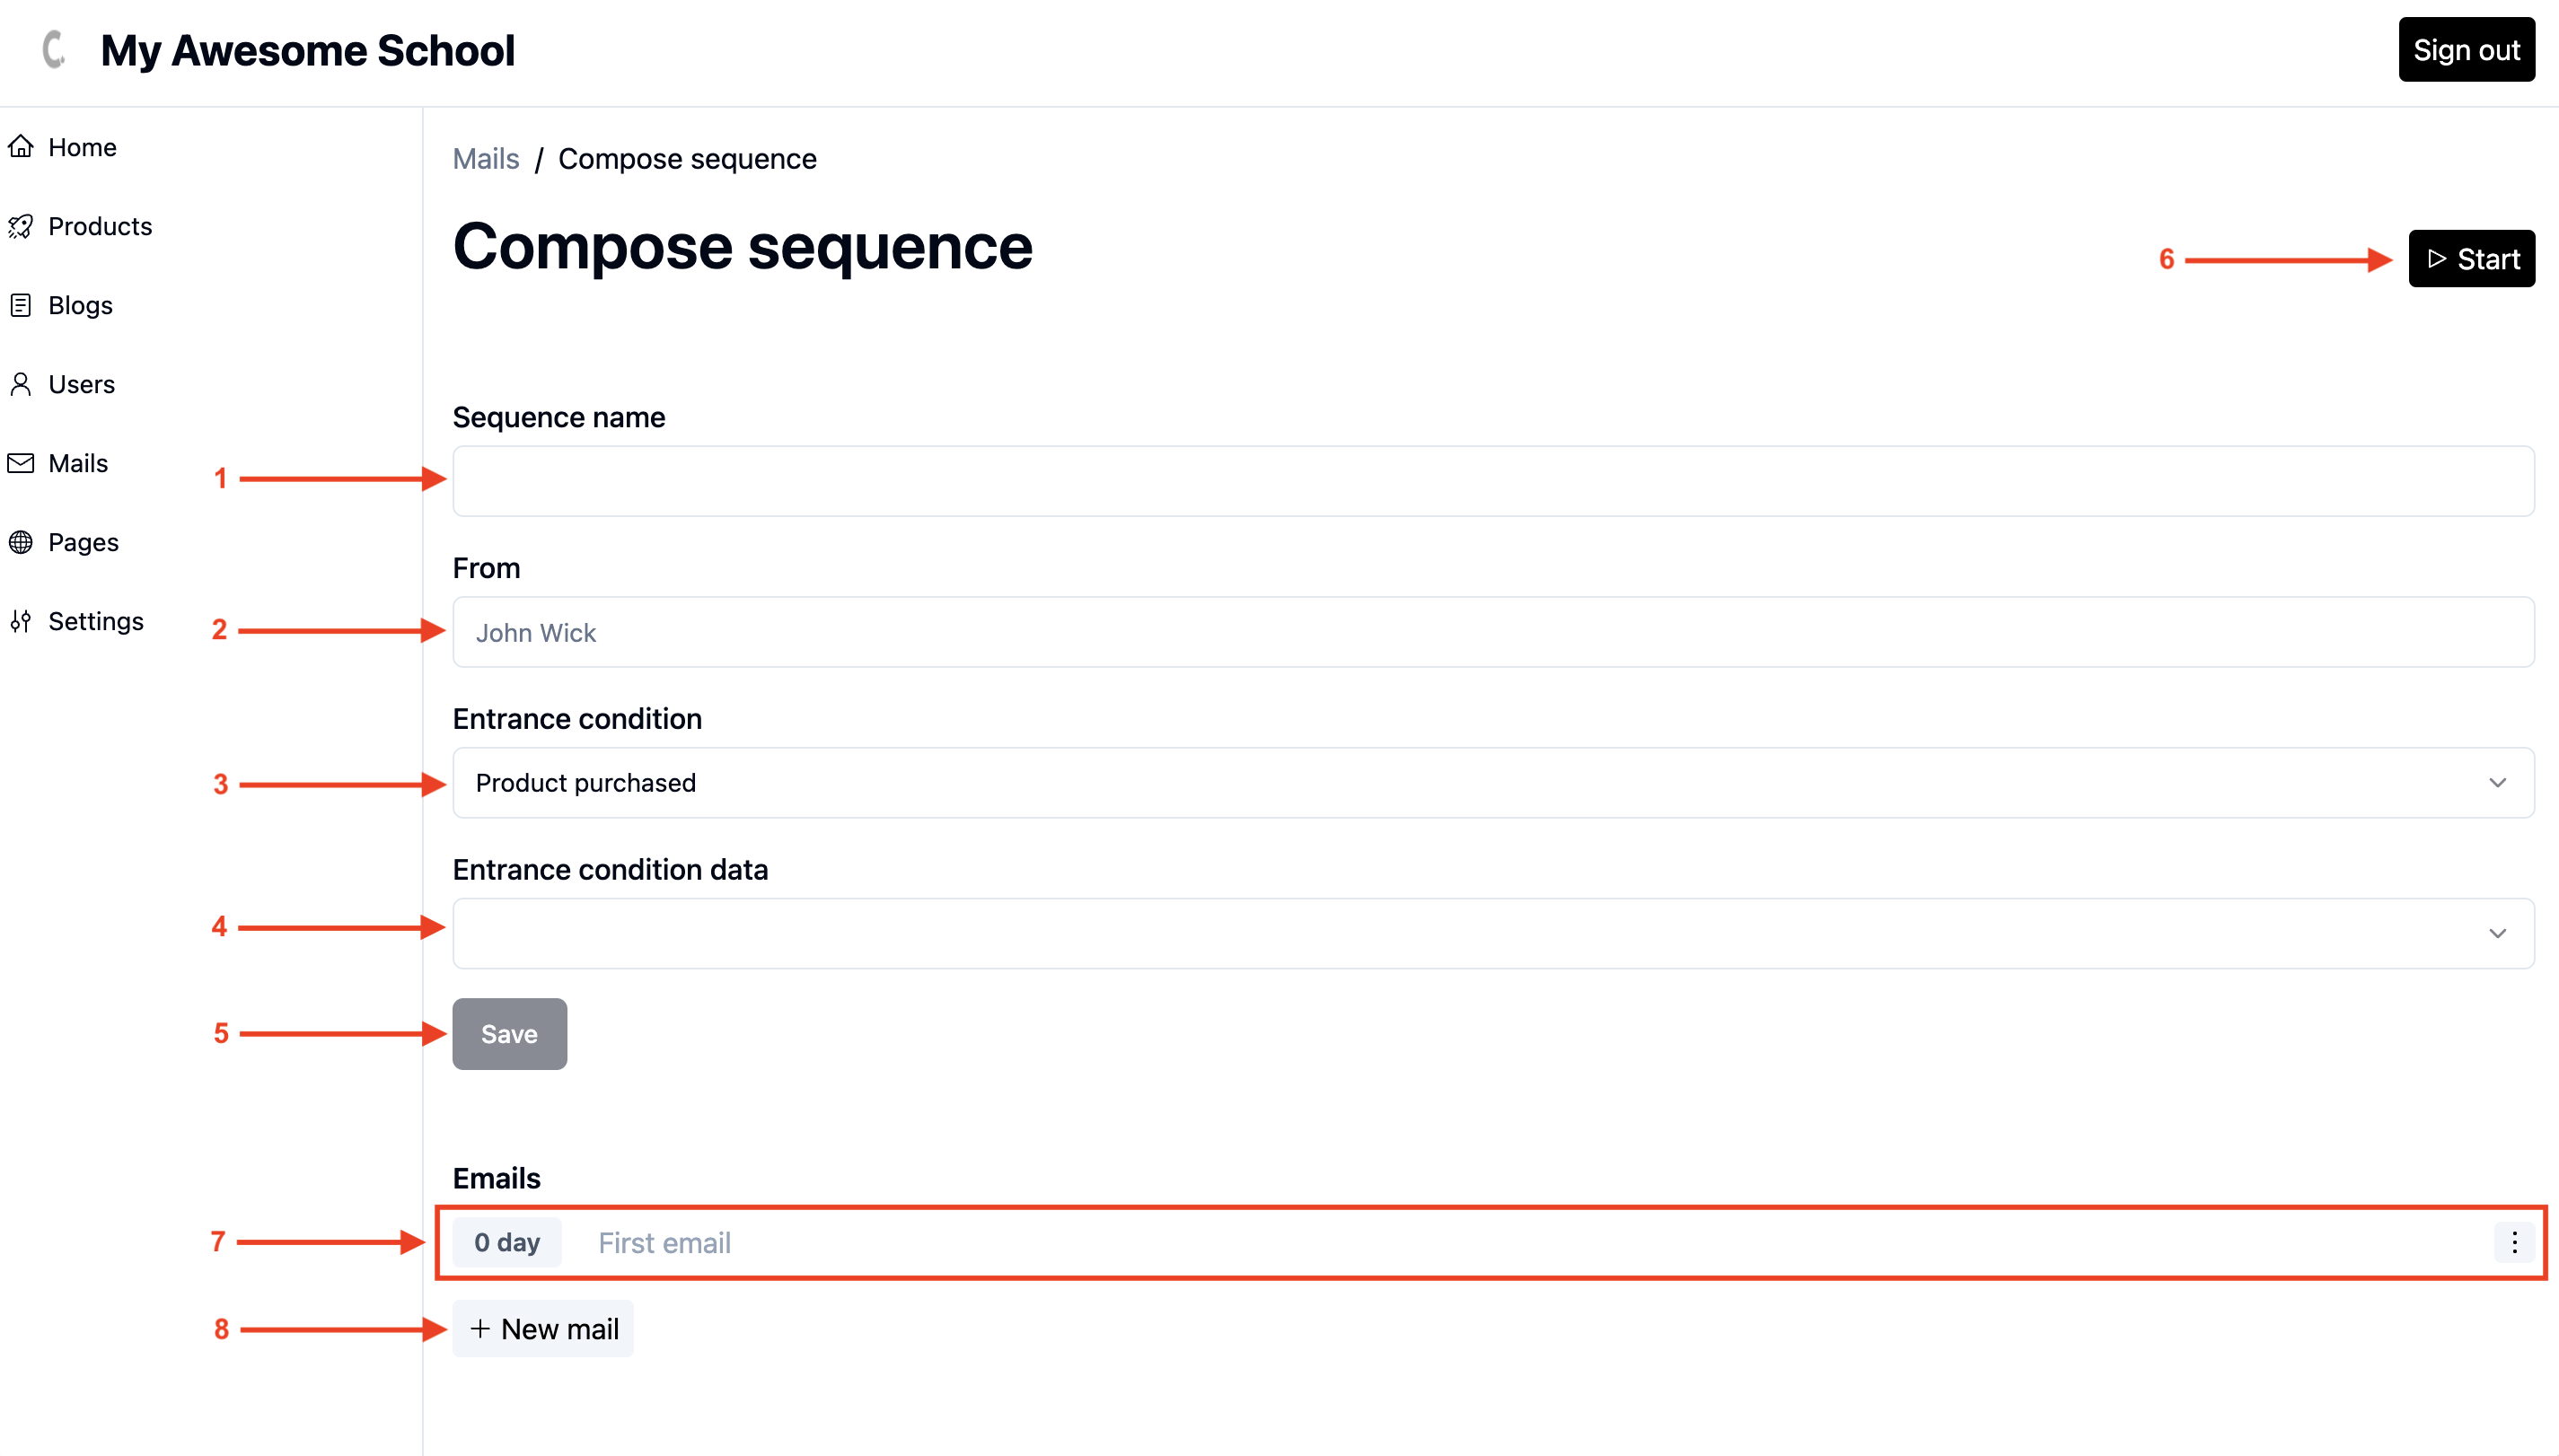
Let’s get acquainted with the interface.
In the following image, we have marked all the sections. To see the description of a section, note its number in the screenshot and find its description below.
-
- Sequence Name: The internal name of the sequence.
-
- From: The sender’s name that is displayed in the emails sent.
-
- Entrance Condition: The condition that triggers this sequence for a user. You can pick from the following conditions:
Tag addedTag removedProduct purchasedSubscriber addedCommunity joinedCommunity left
-
- Entrance Condition Data: The exact tag or product that triggers the sequence. This field is only relevant in the context of the
Entrance Conditionfield.
- Entrance Condition Data: The exact tag or product that triggers the sequence. This field is only relevant in the context of the
-
- Save: A button to save your changes to the sequence.
-
- Start/Pause: A button to start or pause the sequence. Once paused, the sequence won’t be triggered for subsequent events in the system.
-
- Email Row: Shows an overview of one of the emails in the sequence.
-
- New Email Button: A button to add a new email to the sequence.
-
Fill in the details for
Sequence Name,From,Entrance Condition, andEntrance Condition Data(if applicable), then hitSave. -
Start adding emails to this sequence. When you create a new sequence, an empty email is added to it by default.

-
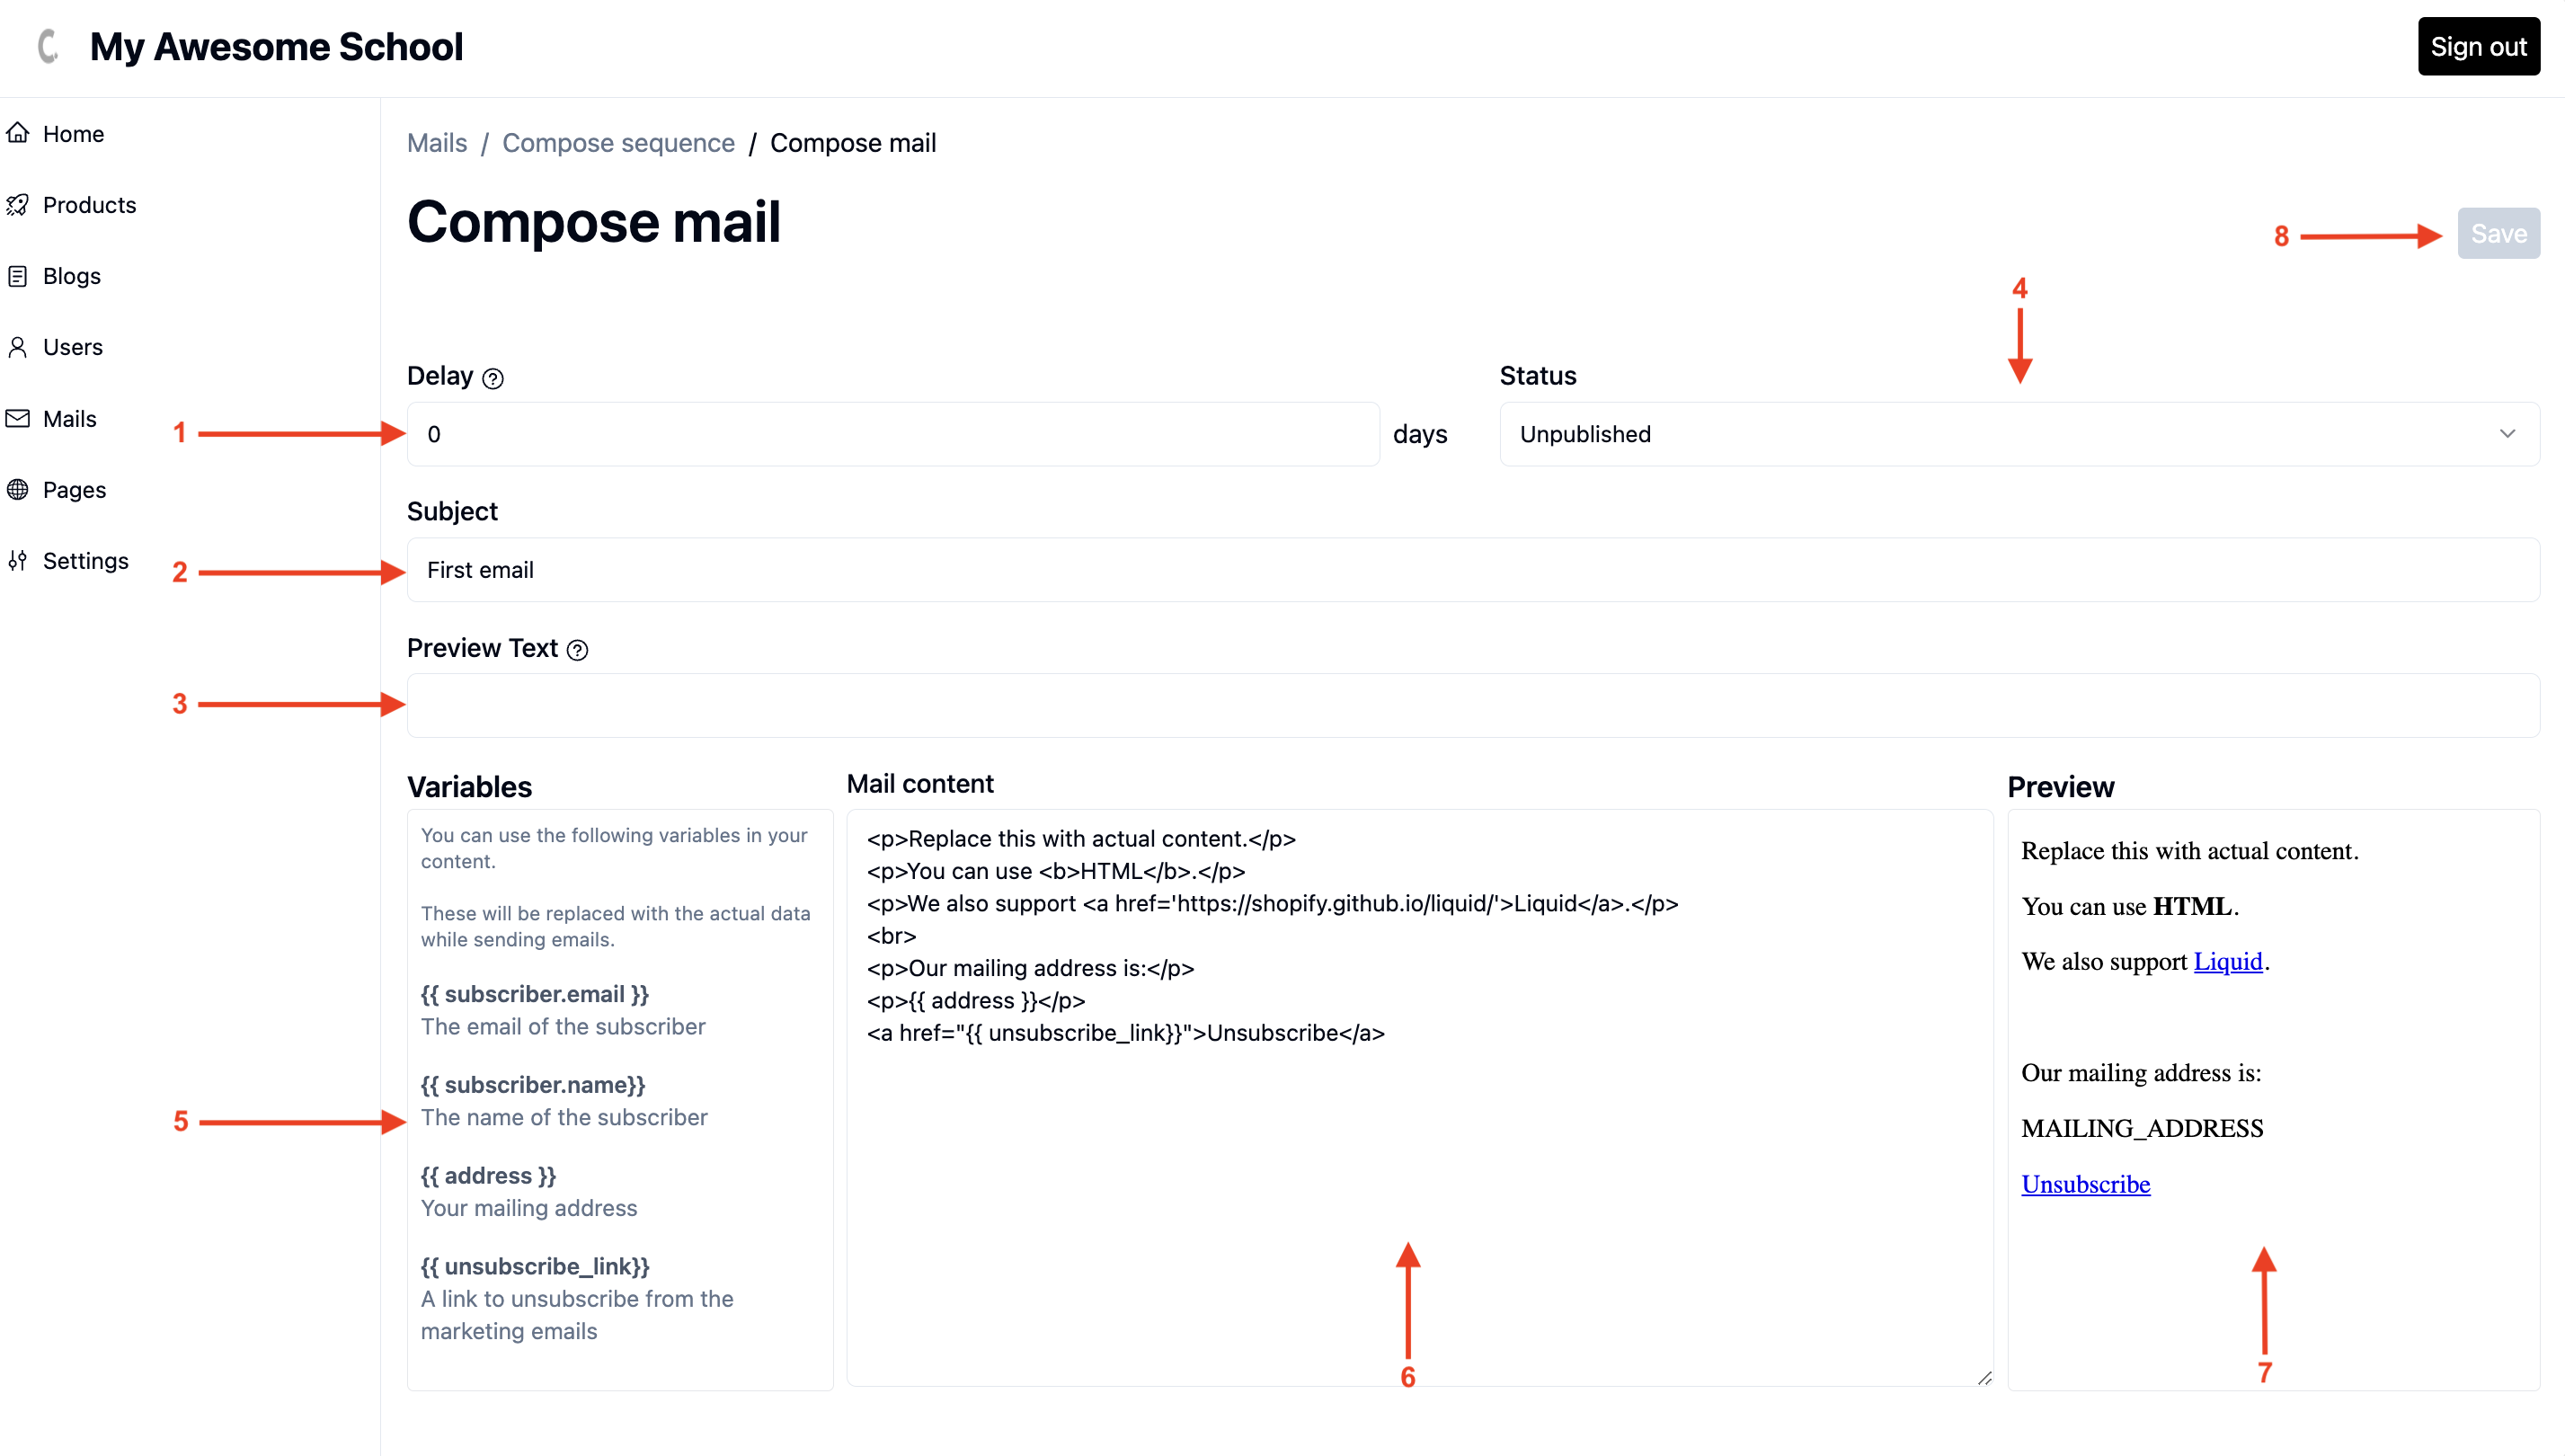
Let’s understand what information an email row shows:

-
- Delay Since the Last Sent Email: This shows the time to wait (in days) since the last email before dispatching this email.
-
- Subject: The subject of the email.
-
- Published: The status of the email. Only published emails are sent to users.
-
-
Context Menu: Contains options like
Delete, etc.
-
The default email has
0 daysas the delay, which means the email will be sent immediately after the user enters the sequence, as it is the first email in the sequence. -
-
To edit an email, click on the subject. This will open the email compose screen as shown below.
-
Let’s get acquainted with the email compose interface:
-
- Delay: The delay (in days) between this email and the previous one.
-
- Subject: The email’s subject.
-
- Email Preview: Live email preview.
During the preview, variables will be displayed as placeholders. The actual values will be replaced when sending the actual email.
- Email Preview: Live email preview.
-
- Status: Only
Publishedemails are sent to users. If you want to skip any email without deleting it from the sequence, just switch its status toUnpublished.
- Status: Only
-
- Mail Edit Button: Opens the mail for editing.
-
- Save Button: A button to save changes to the email’s details like subject, status, etc.
-
-
Edit the email’s subject and status, then hit
Save. -
Edit the email’s content by clicking on the mail edit button. Upon clicking the Mail Edit button, a full-page email editor will open where you can edit the email.
When done, simply press the exit button. All changes are auto-saved.
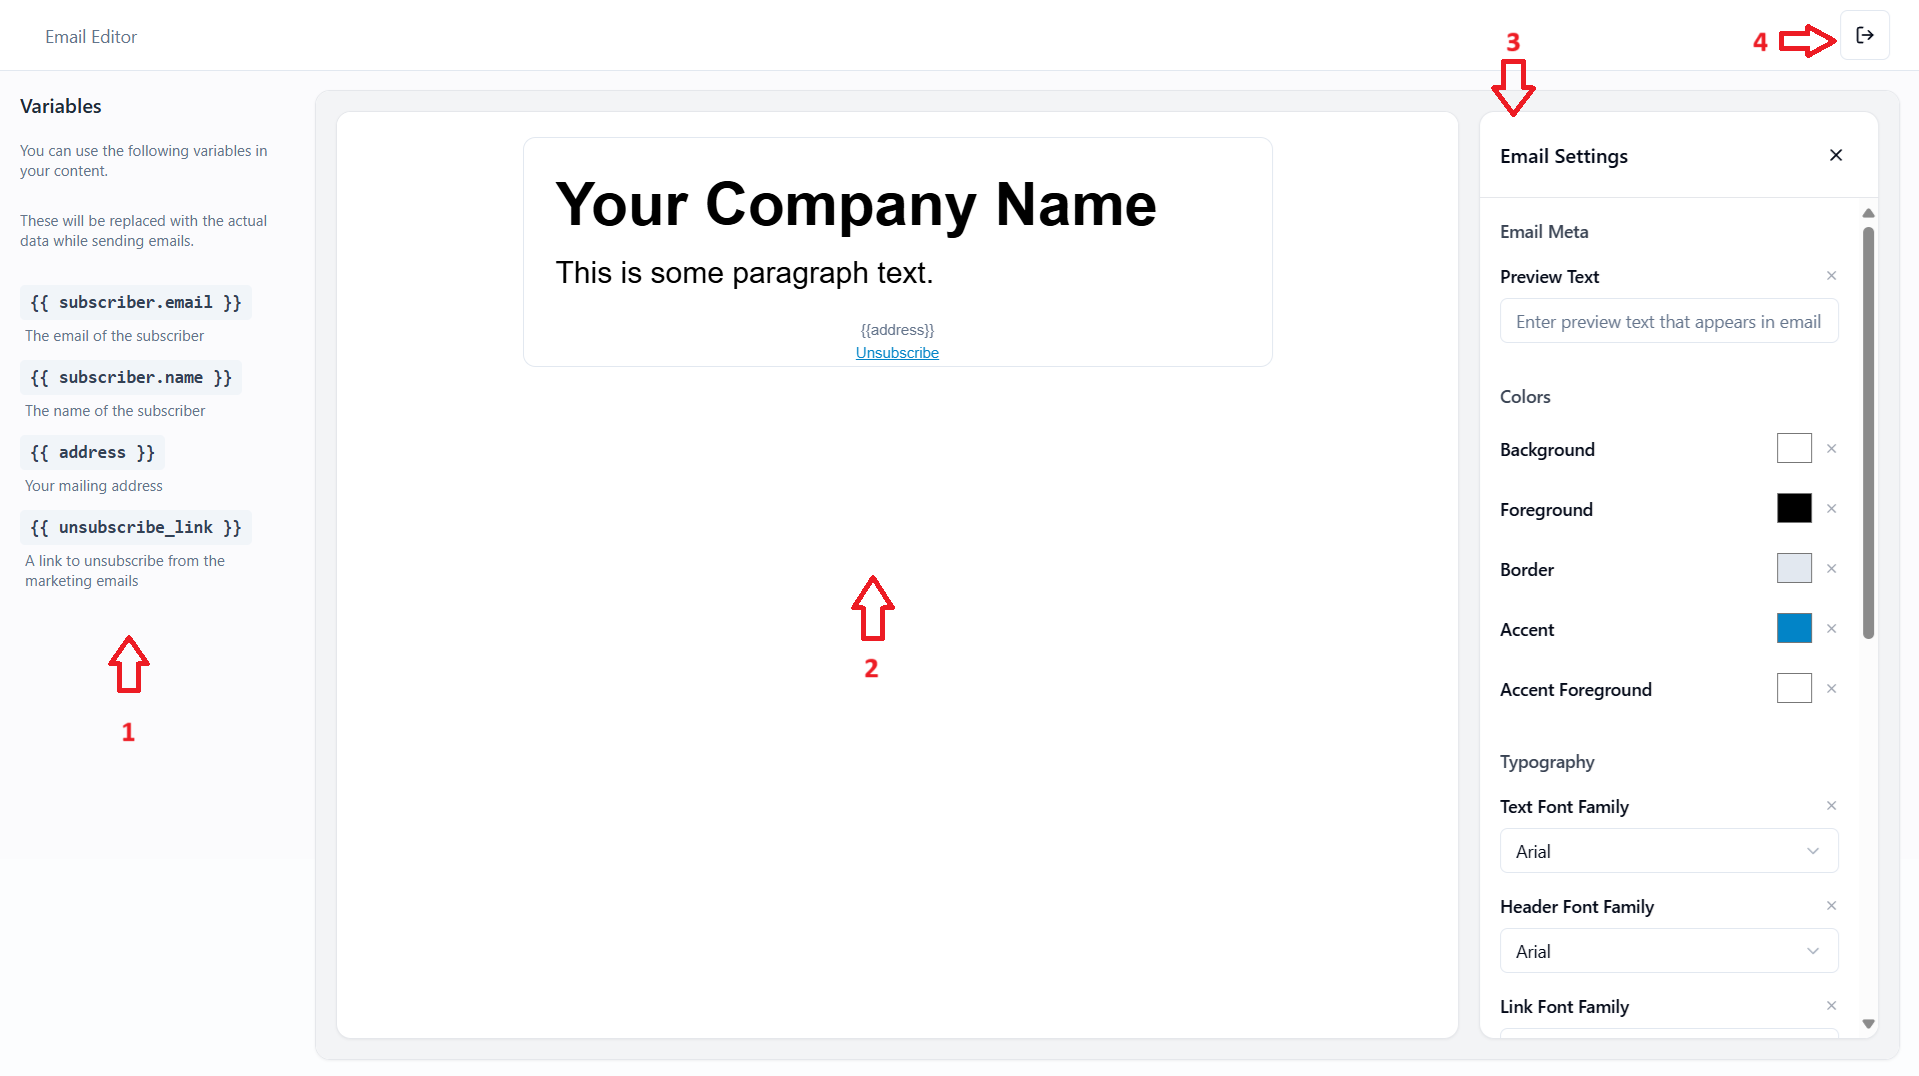
We have annotated the screenshot of the CourseLit email editor:
-
- Variables: You can use these variables in your emails. These variables will be replaced with the actual data when sending the email.
-
- Email Preview: The live preview of the email.
-
- Settings Pane: The settings pane for the email and the selected block.
-
- Exit Button: The email editor exit button.
-
-
To go back to the sequence settings, click on the
Compose sequencebreadcrumb as shown below.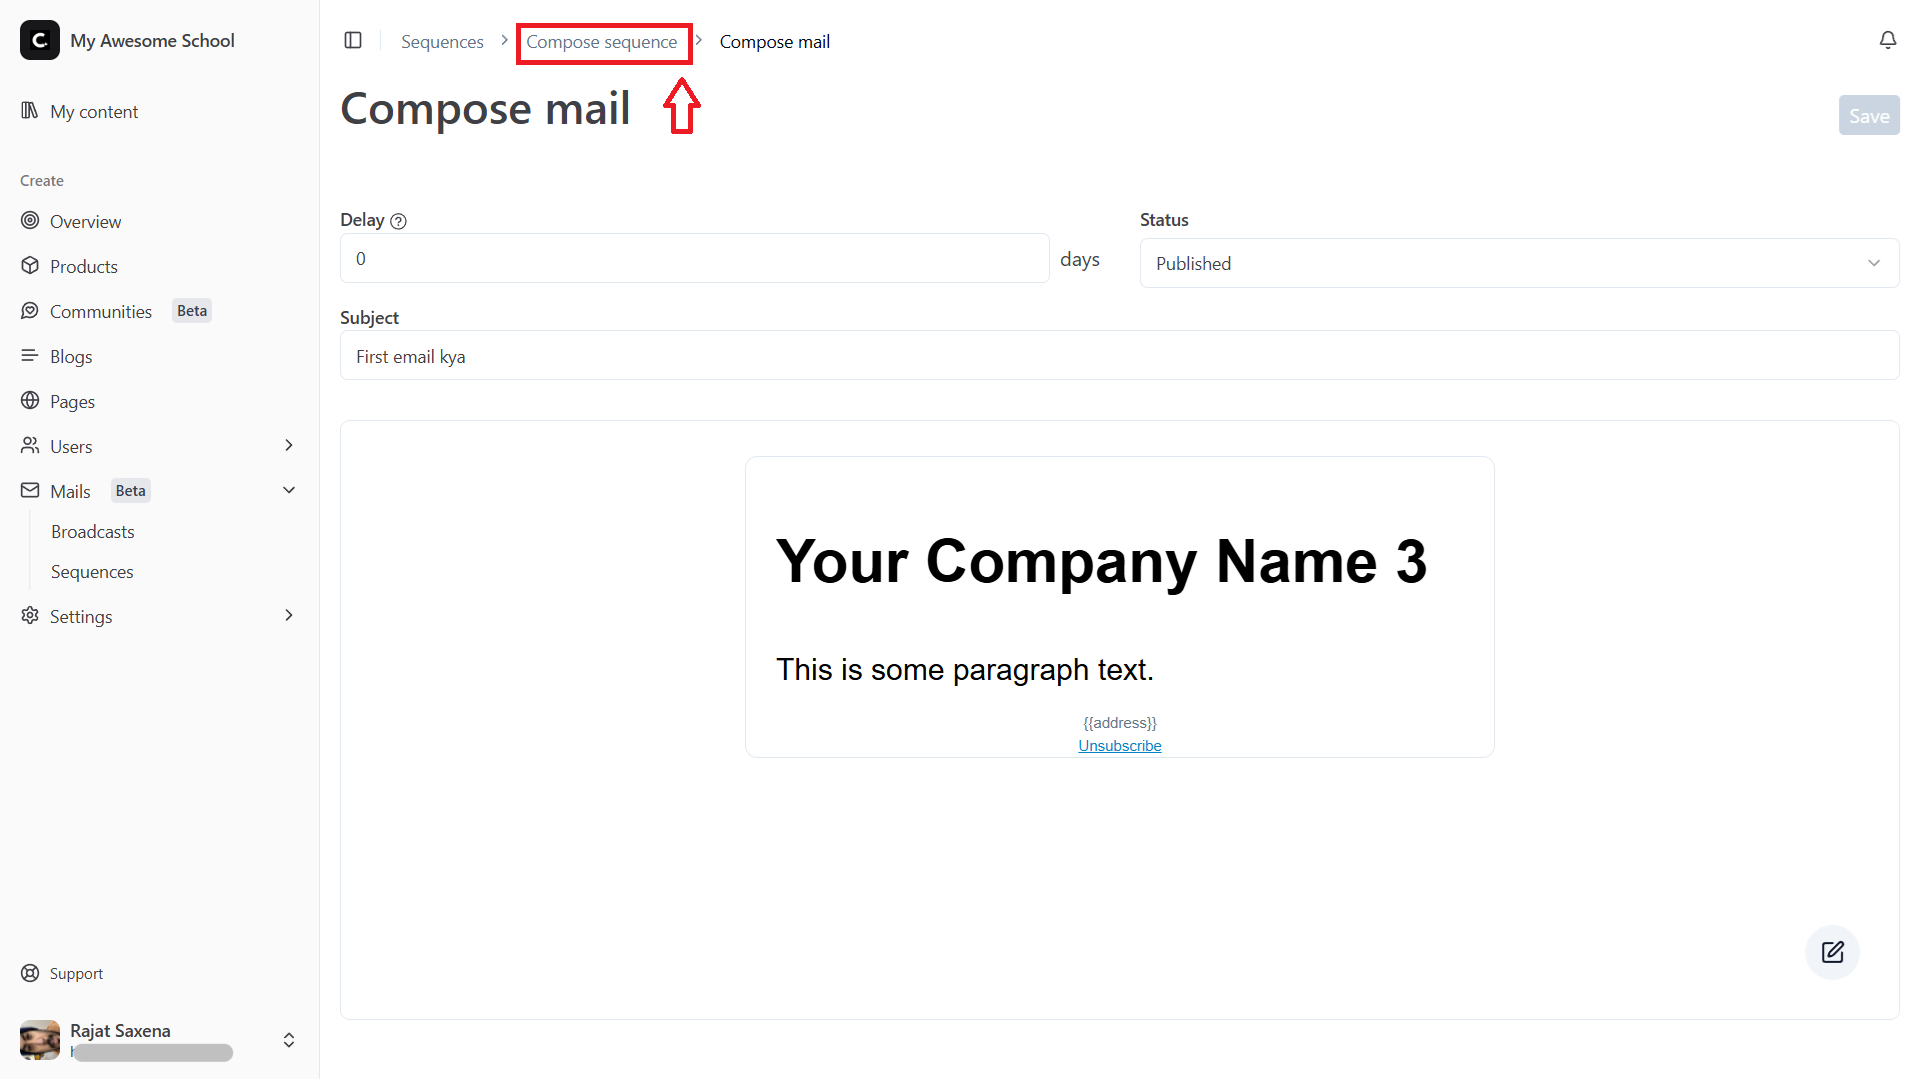
-
Add more emails to the sequence by clicking on the
New emailbutton. -
Keep editing your sequence until you think it’s perfect. Once you are satisfied with your sequence, hit the
Startbutton to begin sending this sequence to users.
Next Steps
Now that you understand how to create email sequences, you can also see:
Stuck Somewhere?
We are always here for you. Come chat with us in our Discord channel or send a tweet to @CourseLit.