 CourseLit Docs
Configure reply by email
Configure Amazon SES, Postmark, or Mailgun so discussion notification emails can receive replies.
CourseLit can put a per-recipient Reply-To address on Community and product-discussion notifications. A reply sent to that address is added to the correct discussion as the notification recipient.
This requires an active queue worker and one inbound-email provider. The providers supported out of the box are Amazon SES, Postmark, and Mailgun. Choose one provider for each inbound reply domain.
Before you configure a provider
- Use a dedicated subdomain, such as
replies.example.com. Do not point the MX records for your primary school domain at this feature. - Set the same
INBOUND_EMAIL_DOMAIN=replies.example.comvalue in both theappandqueueservices. The queue service mints the reply address; the app service accepts inbound callbacks. - Enable the
queueservice in the supplied Docker Compose file. If the queue does not receiveINBOUND_EMAIL_DOMAIN, outgoing emails intentionally have no reply token orReply-Toheader. - Generate provider secrets with a password manager or
openssl rand -base64 32. Keep them out of source control and webhook URLs except where a provider requires HTTP Basic authentication.
The webhook endpoint is always https://<your-app-host>/api/inbound-email/<provider>. Your reverse proxy must expose this HTTPS path without adding tenant headers or requiring dashboard authentication. Outbound SMTP and inbound reply processing are independent, so they may use different providers. CourseLit validates the provider callback before it reads a reply. Attachments and HTML reply parsing are not supported; CourseLit stores up to 5,000 characters of the plain-text reply.
Environment variables
Set the common value in both services, then set only the values for your chosen provider in the app service.
# app and queue
INBOUND_EMAIL_DOMAIN=replies.example.com

# app only — Postmark
INBOUND_EMAIL_WEBHOOK_SECRET=replace-with-a-random-secret

# app only — Mailgun
MAILGUN_WEBHOOK_SIGNING_KEY=copy-from-mailgun-webhook-signing-key

# app only — Amazon SES
INBOUND_EMAIL_SES_TOPIC_ARN=arn:aws:sns:us-east-1:123456789012:courselit-inbound
INBOUND_EMAIL_SES_BUCKET=courselit-inbound-email
INBOUND_EMAIL_SES_REGION=us-east-1
INBOUND_EMAIL_SES_OBJECT_PREFIX=inbound
INBOUND_EMAIL_SES_OBJECT_PREFIX is optional. If set, it must exactly match the S3 key prefix configured in the SES receipt rule, without leading or trailing slashes.
Amazon SES
Amazon SES is a first-class option and is the recommended route for an AWS-hosted CourseLit deployment. Follow the SES receiving setup guide in an AWS Region that supports receiving email.
First, verify replies.example.com in SES and publish the MX record that SES gives you. Its value is region-specific, for example inbound-smtp.us-east-1.amazonaws.com. Use the same AWS Region for the SES receipt rule, SNS topic, and S3 bucket.
Create the SES receipt rule
-
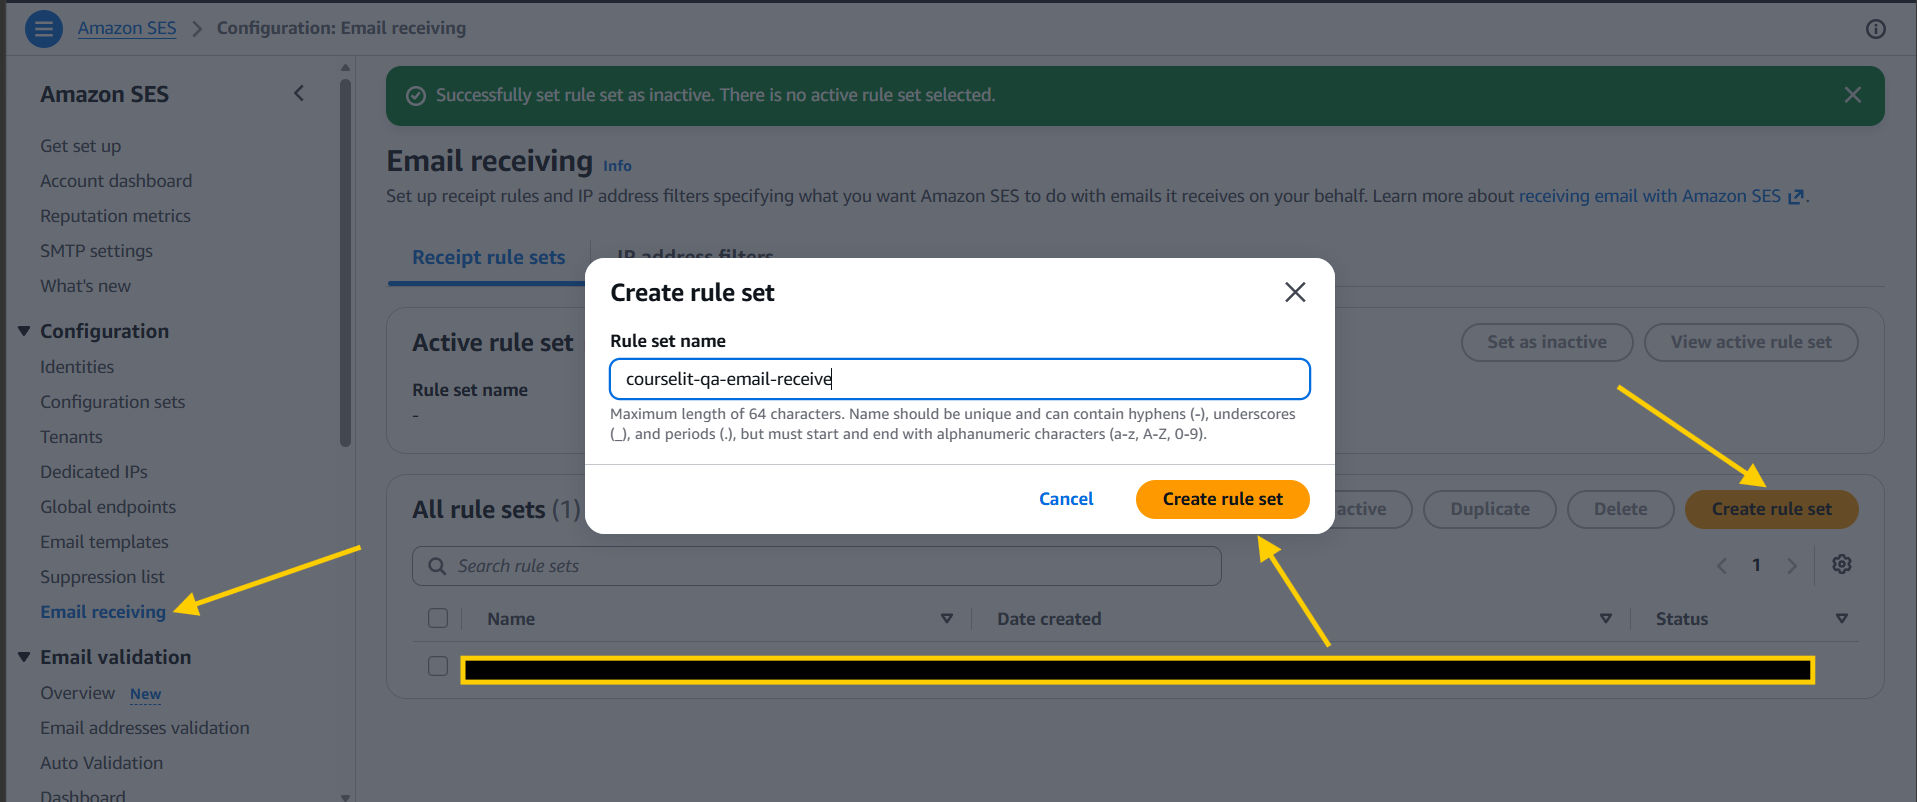
In Amazon SES → Email receiving, create a receipt rule set.
-
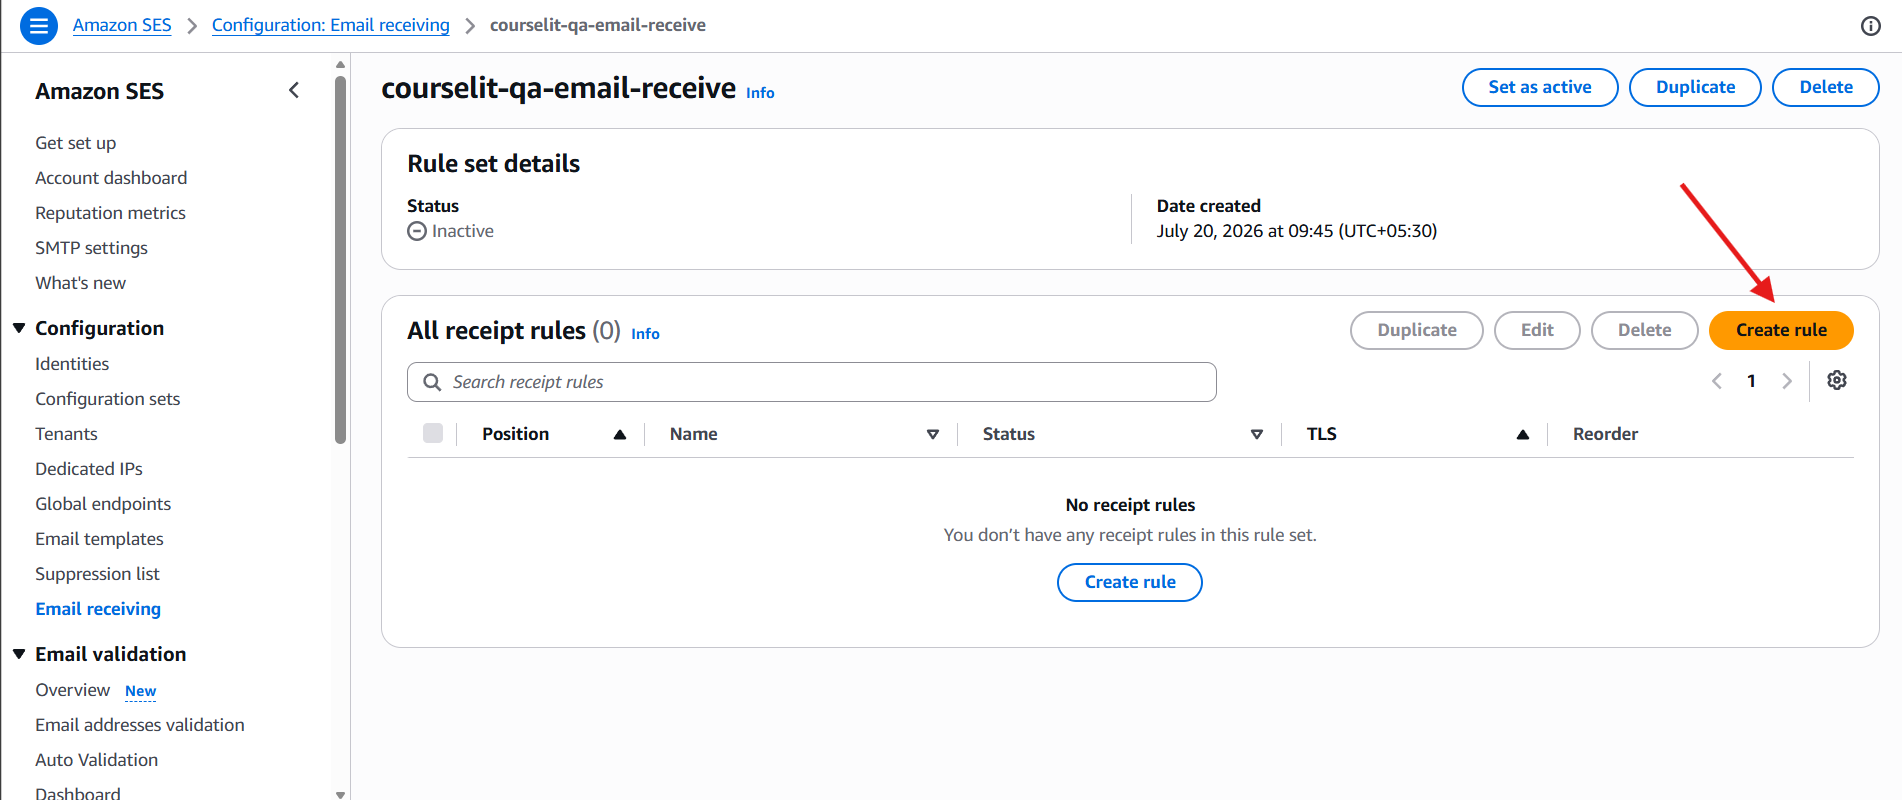
Open the new rule set and choose Create rule.
-
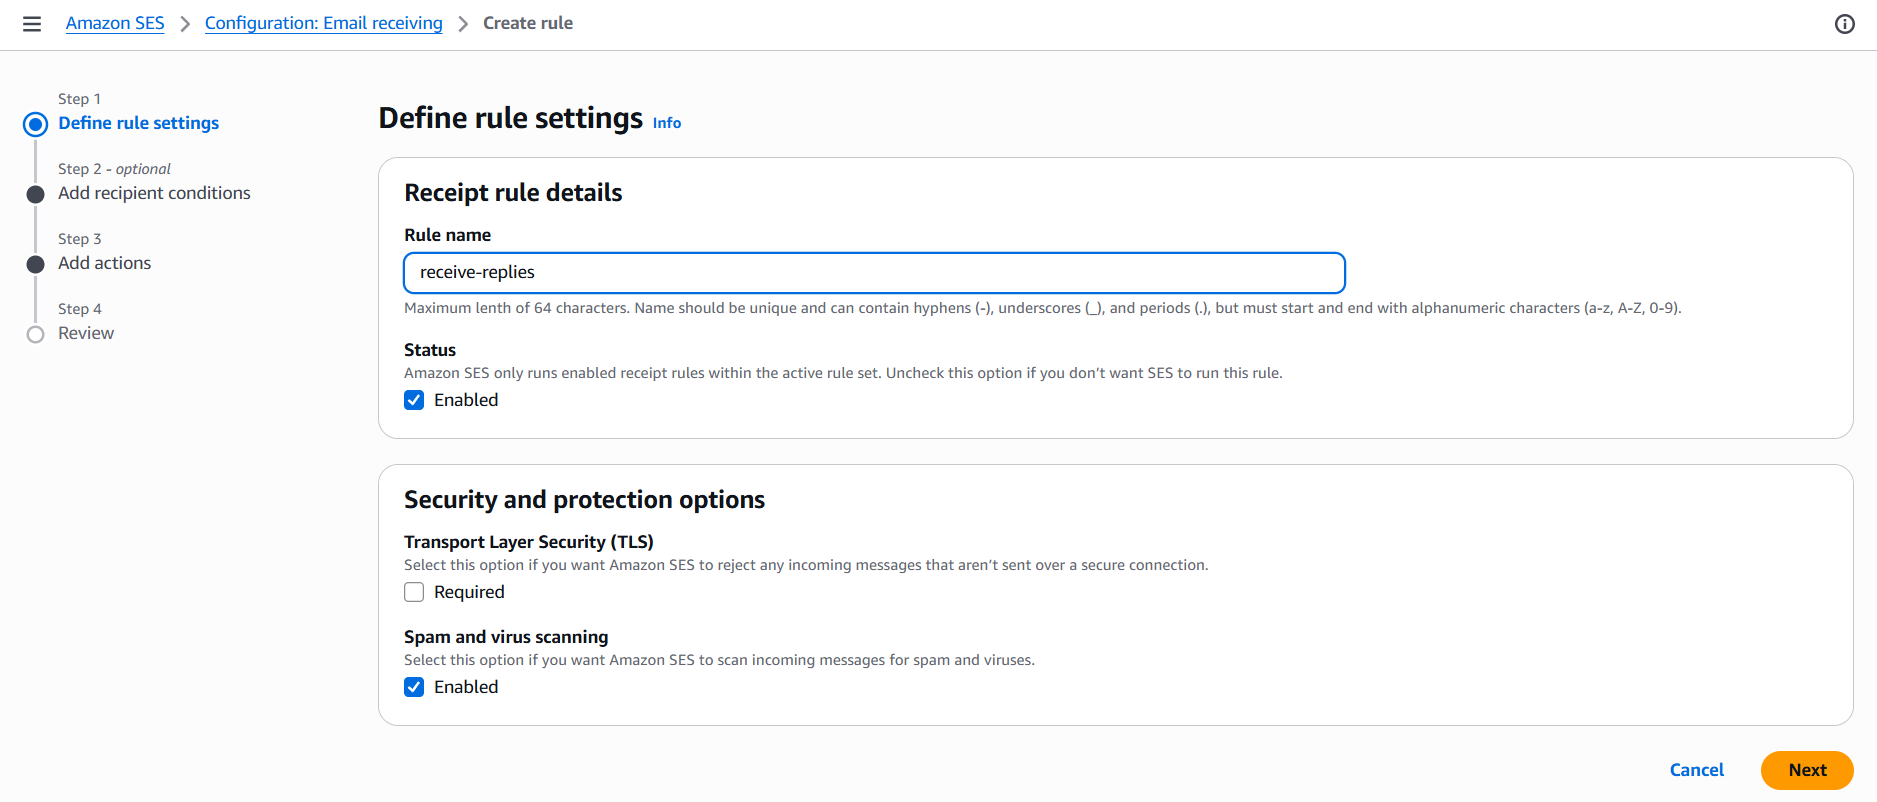
Give the rule a descriptive name, leave it enabled, and enable spam and virus scanning. Requiring TLS is optional.
-
Add
replies.example.comas the recipient condition. Using the dedicated subdomain accepts every generatedreply+<token>address beneath it.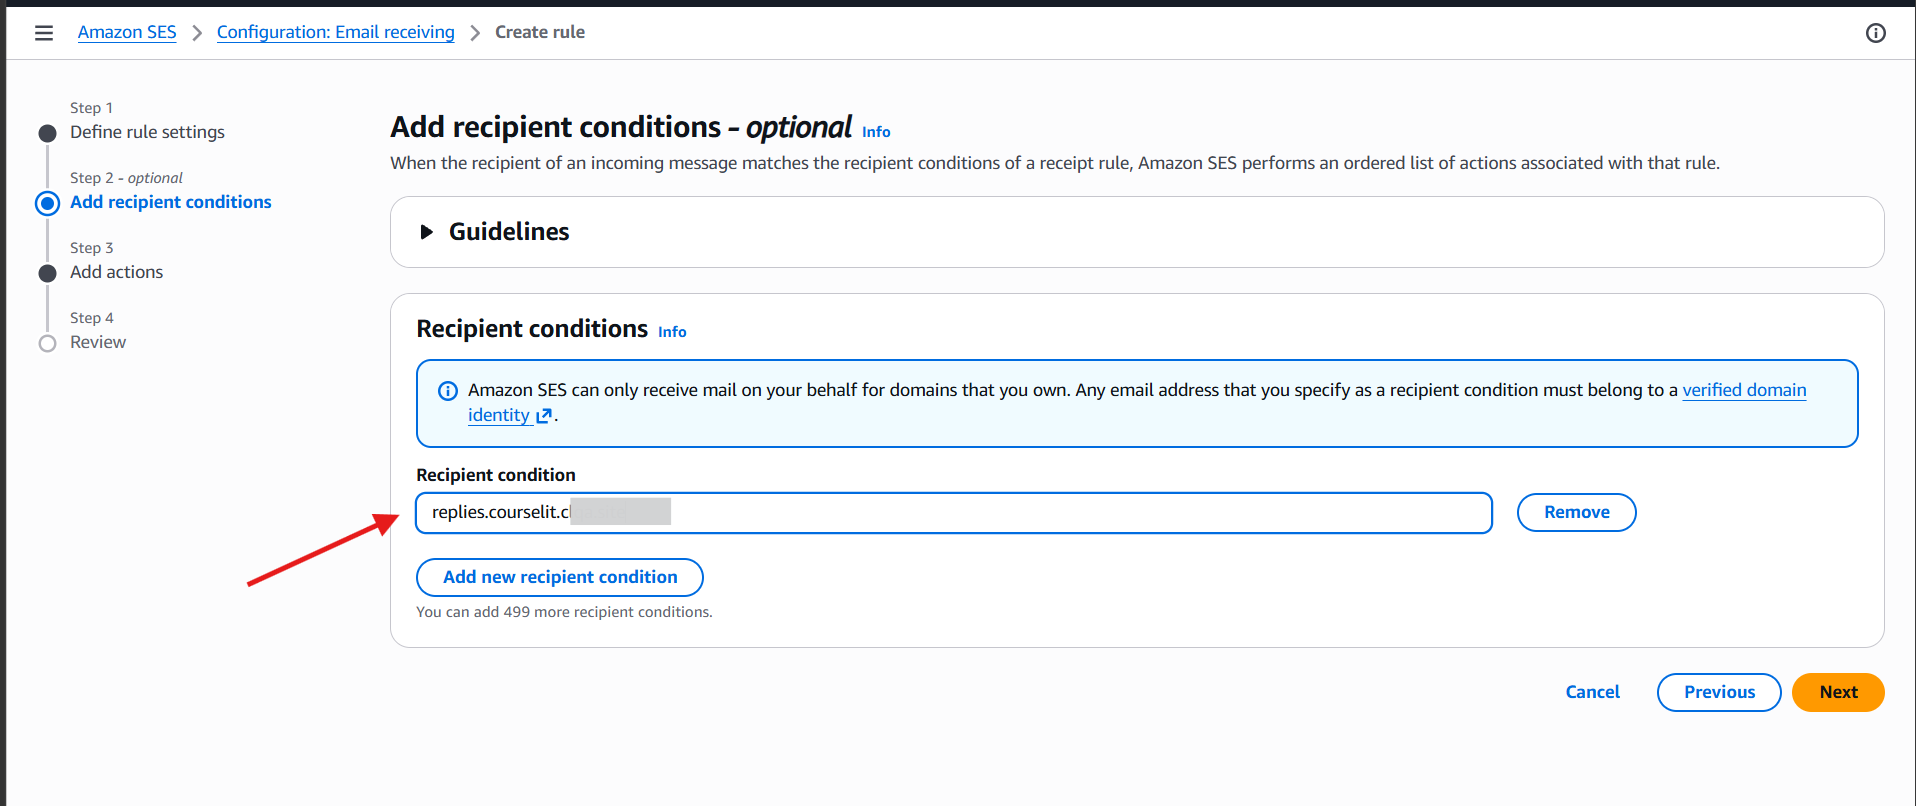
-
Add a Deliver to Amazon S3 bucket action. Select an existing bucket or create a private bucket for inbound messages. If you set an object key prefix, copy the exact value to
INBOUND_EMAIL_SES_OBJECT_PREFIXwithout leading or trailing slashes.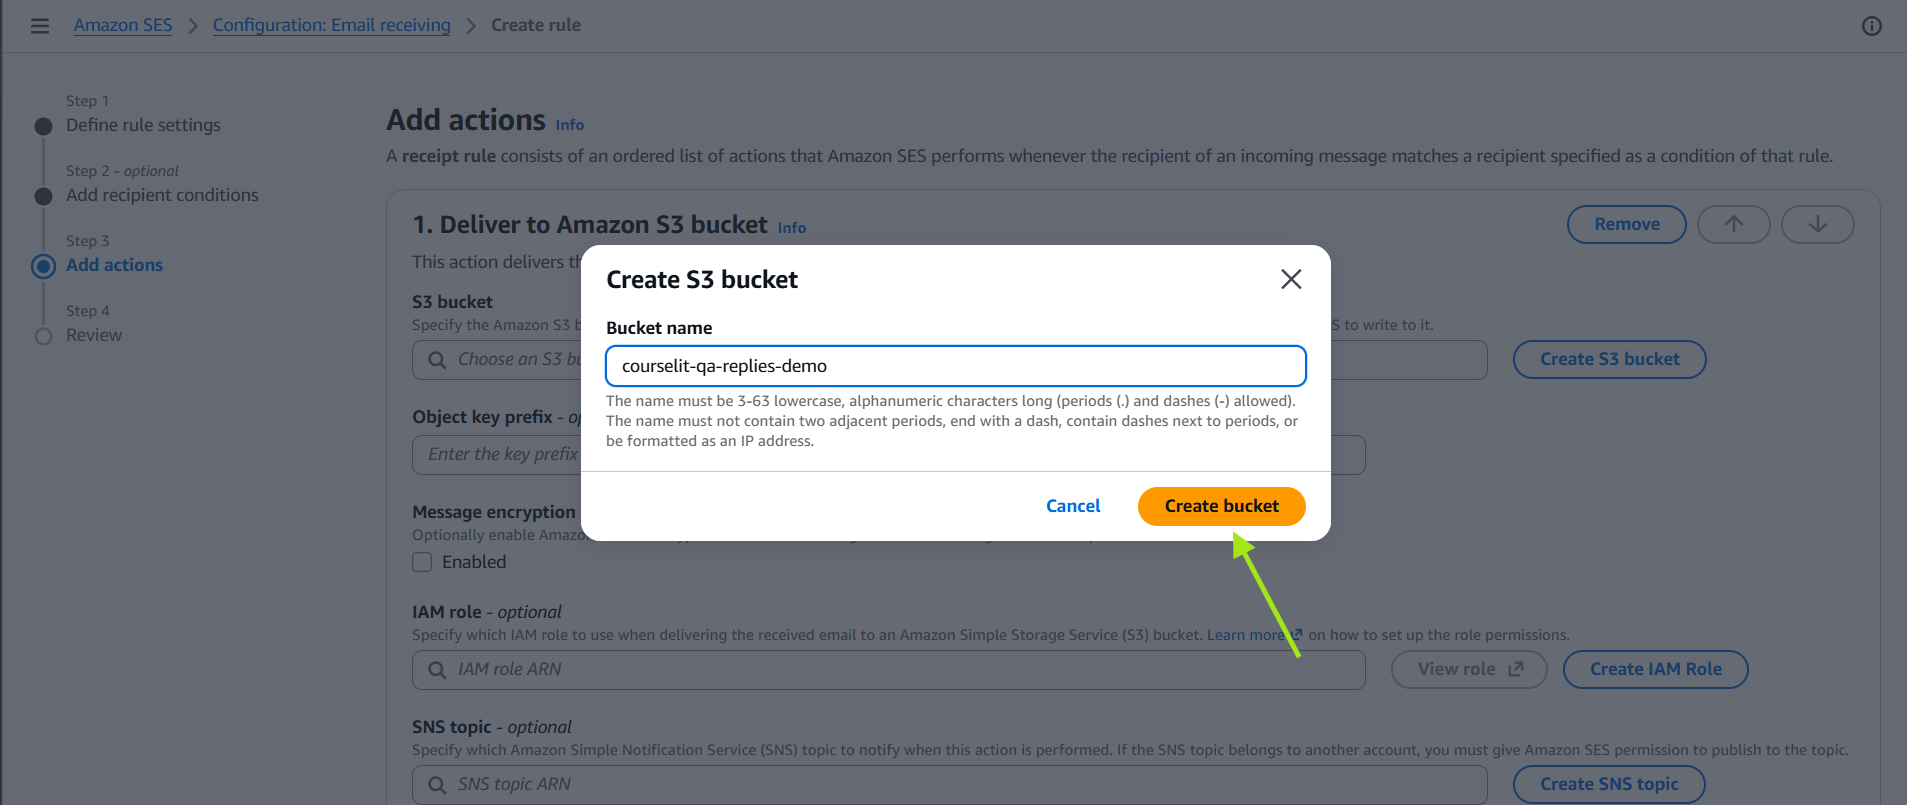
-
In the same S3 action, select an SNS topic or create a Standard topic. Copy its ARN to
INBOUND_EMAIL_SES_TOPIC_ARN. Do not add a separate direct SNS action: the S3 action's SNS notification tells CourseLit which stored MIME message to fetch without imposing SNS's smaller mail-content limit.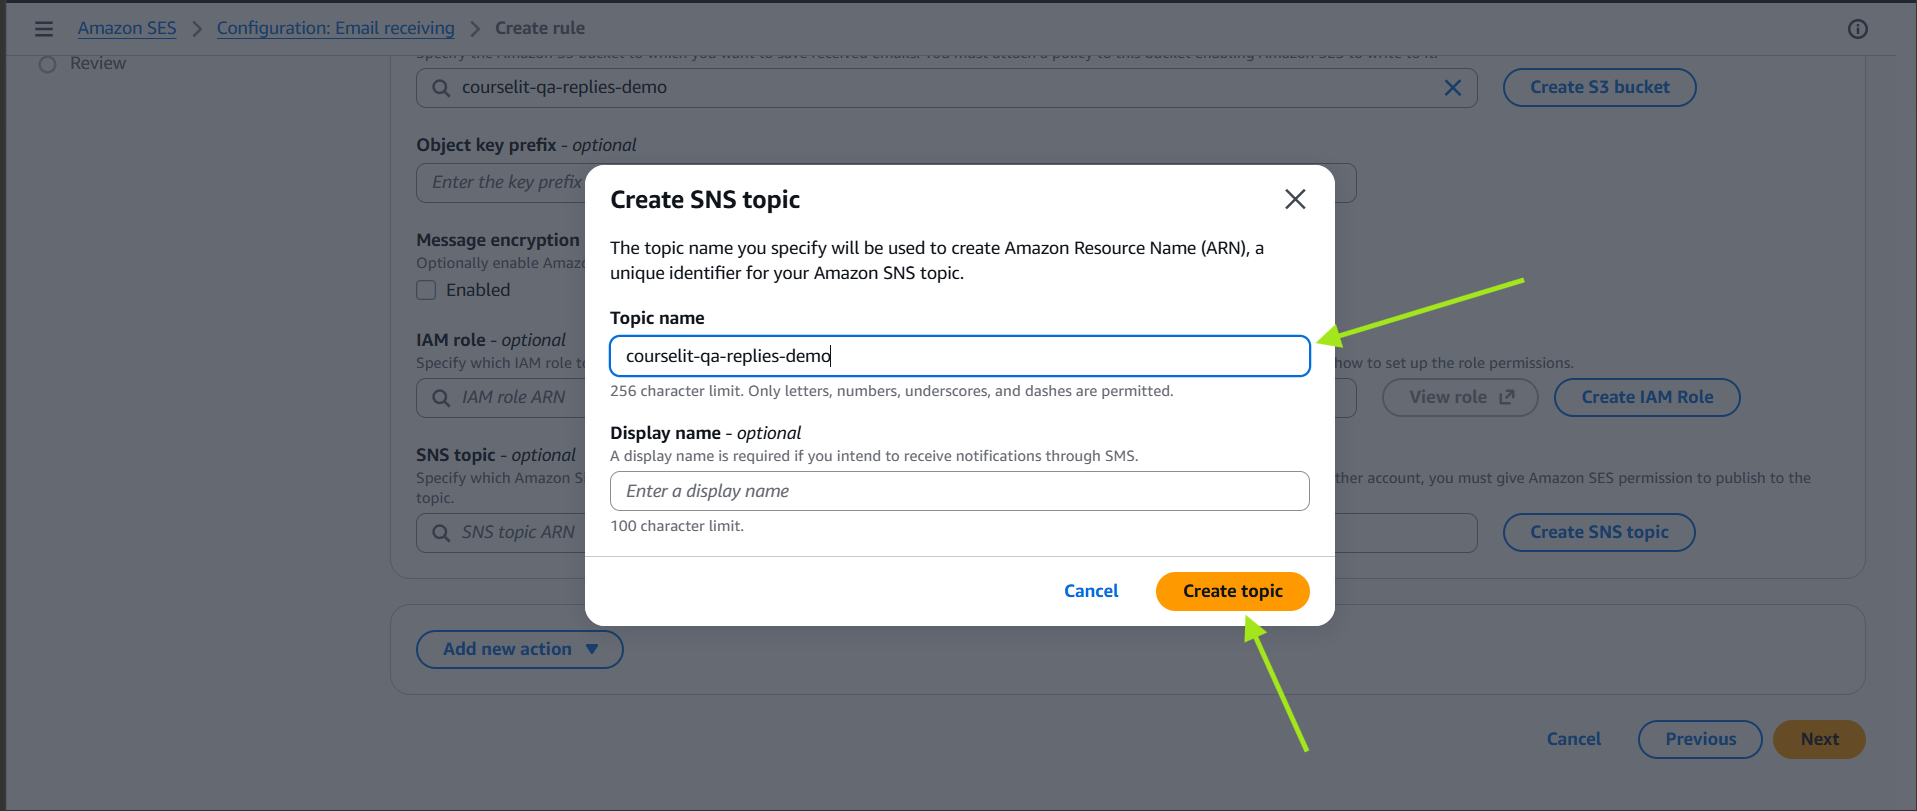
-
Review the rule and create it.
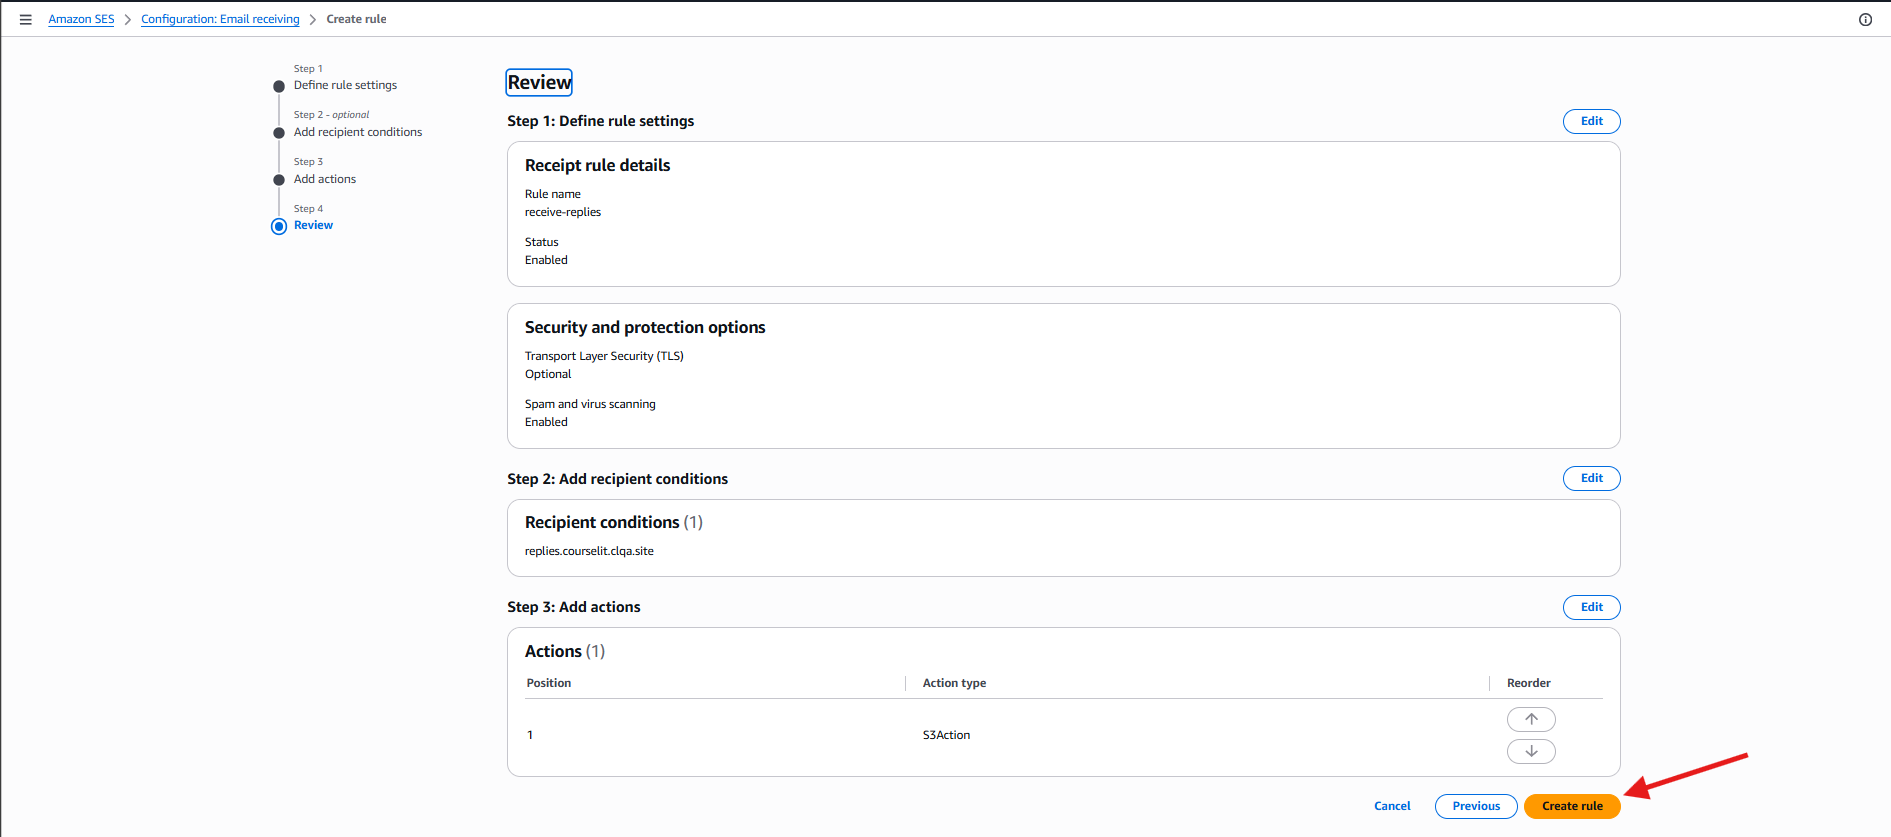
-
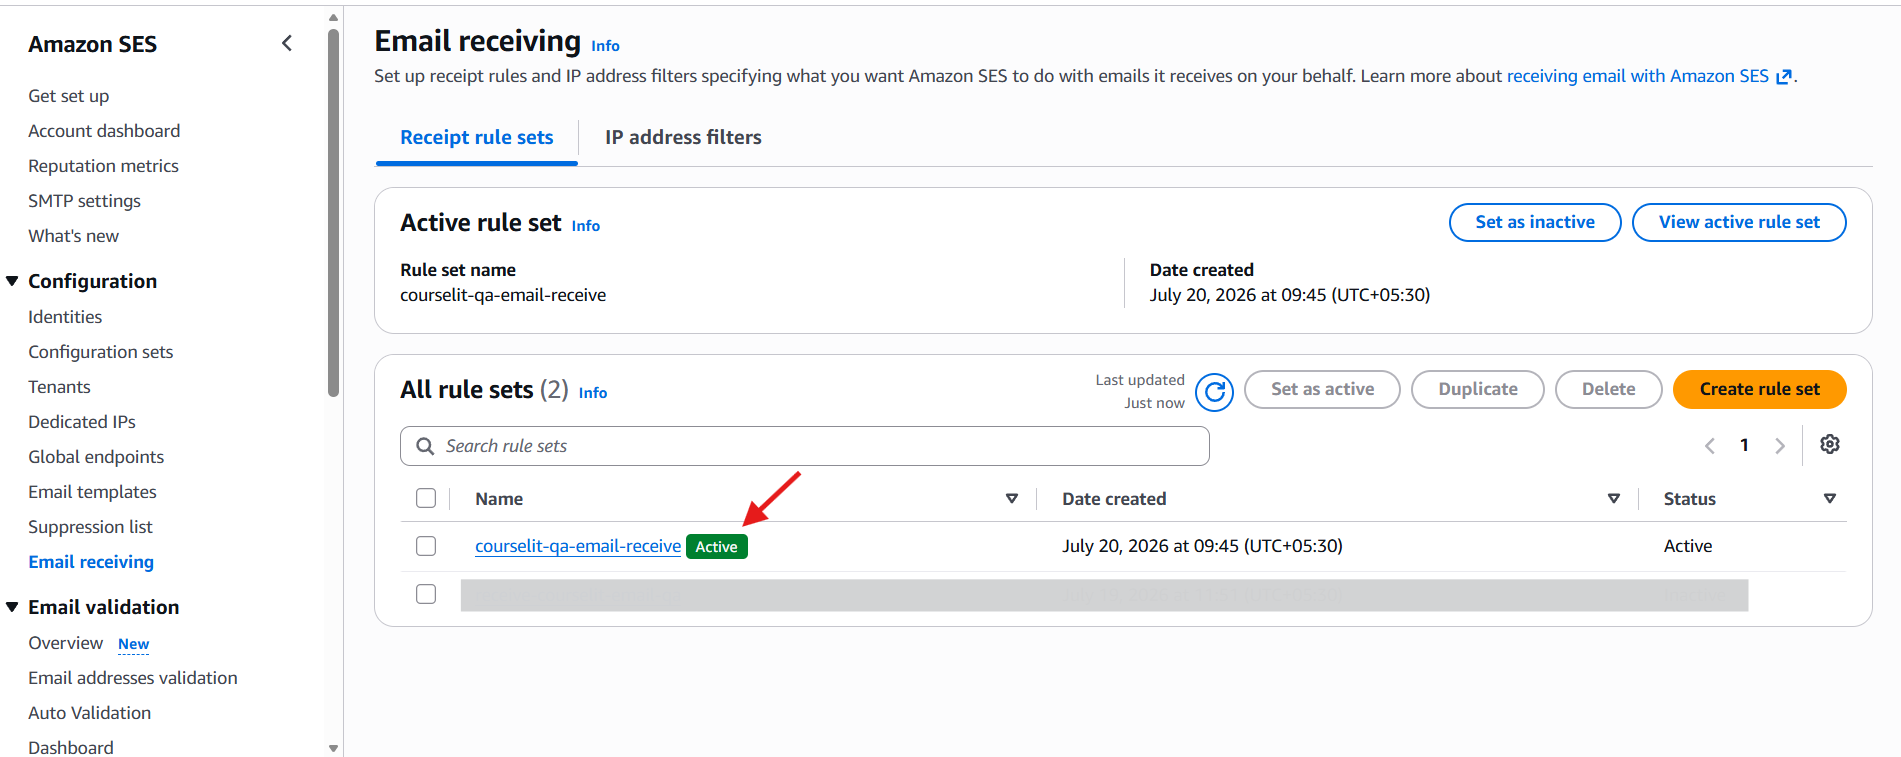
Return to the rule set and choose Set as active. SES evaluates only the active receipt rule set, even when an individual rule says Enabled.
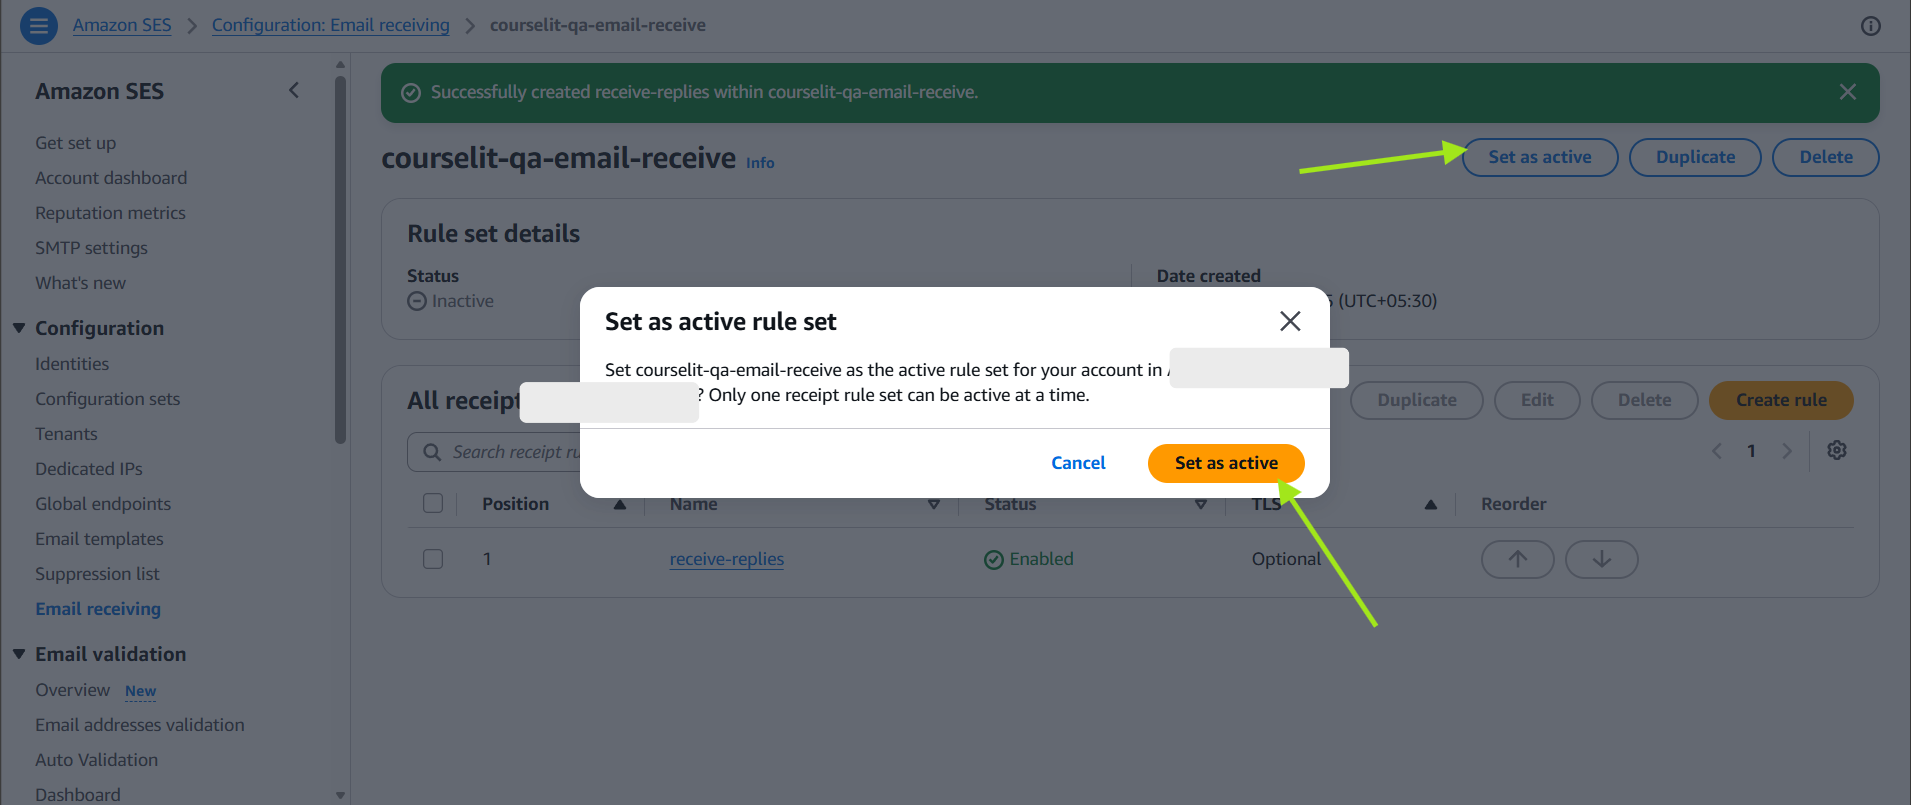
Confirm that the rule set now appears under Active rule set.
Subscribe CourseLit to the SNS topic
-
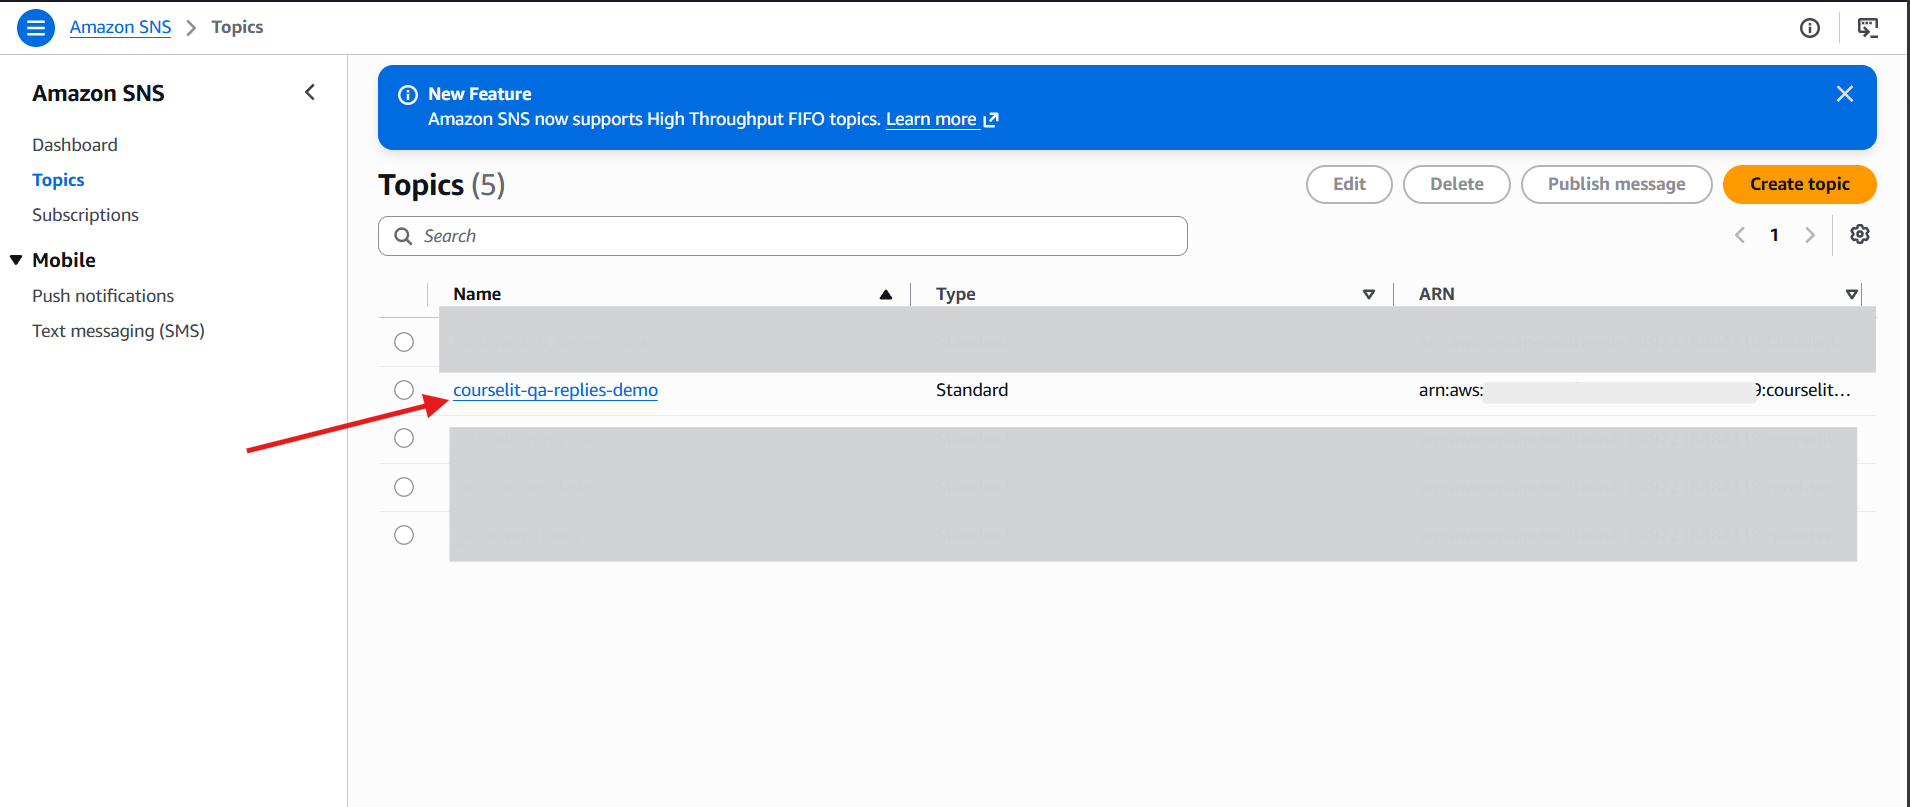
In Amazon SNS, open the topic attached to the SES S3 action.
-
Configure the topic to use SNS SignatureVersion 2. CourseLit requires the SHA-256 signature version and rejects SNS's legacy SignatureVersion 1 default. The SNS topic console does not expose this setting, so run the following in AWS CloudShell or with the AWS CLI (replace the placeholders):
aws sns set-topic-attributes \ --region <aws-region> \ --topic-arn arn:aws:sns:<aws-region>:<aws-account-id>:<topic-name> \ --attribute-name SignatureVersion \ --attribute-value 2 -
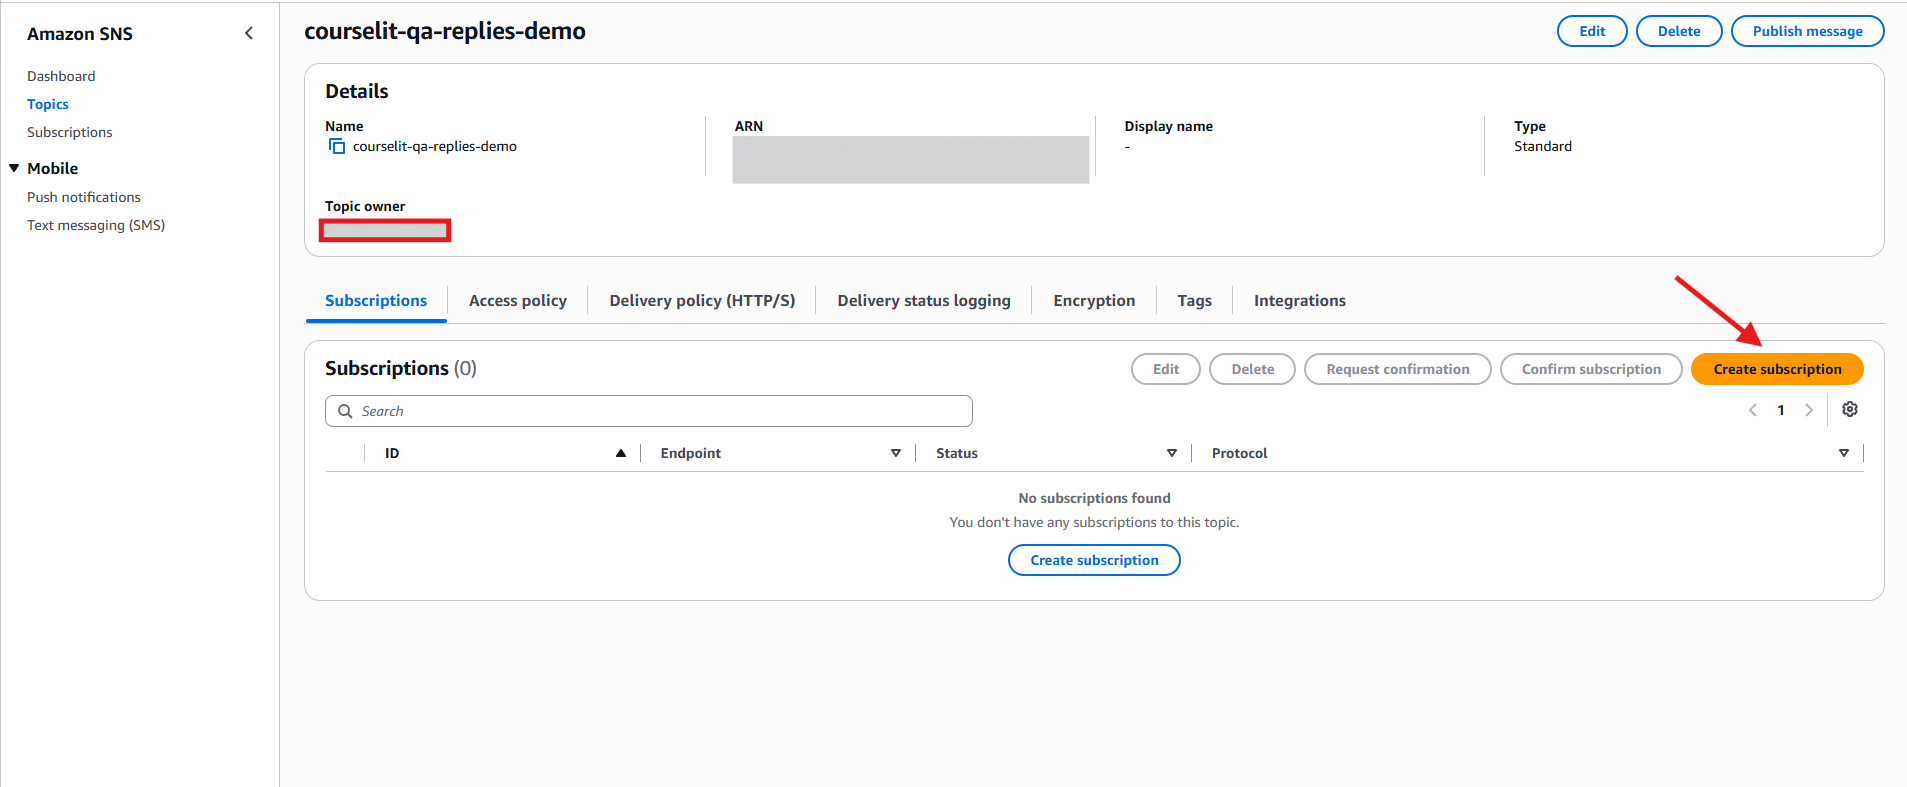
On the topic's Subscriptions tab, choose Create subscription.
-
Select HTTPS and enter
https://<your-app-host>/api/inbound-email/ses. Leave Enable raw message delivery off.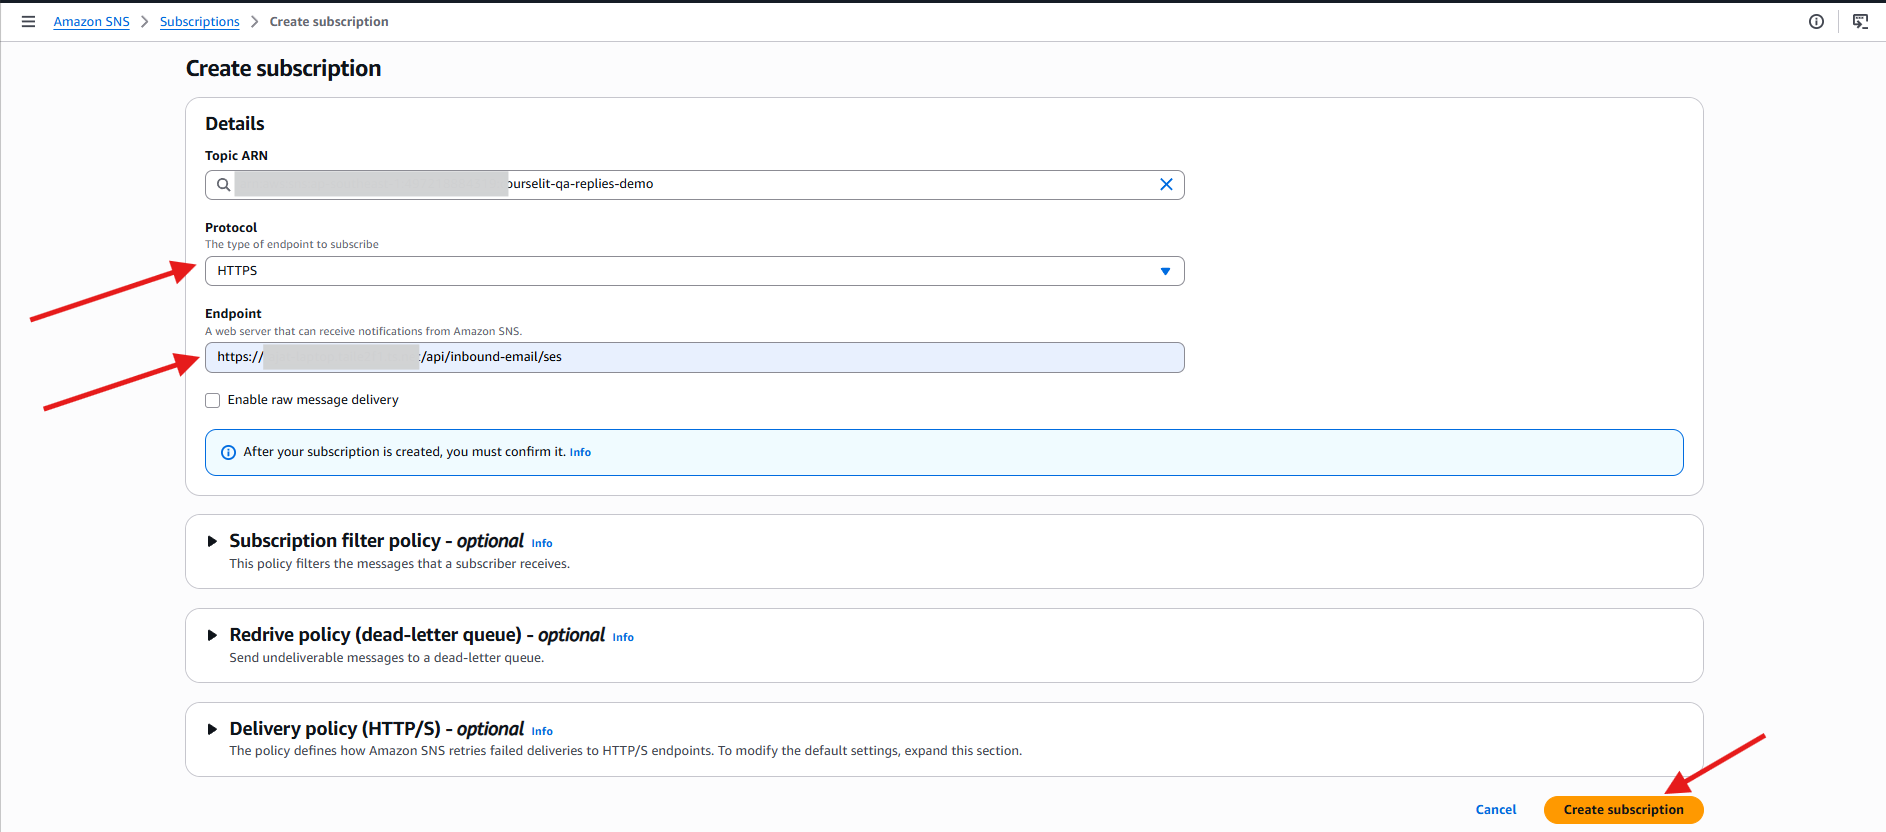
-
The subscription briefly shows Pending confirmation. CourseLit verifies the SNS signature and configured topic ARN, then confirms a valid request automatically. The app must be publicly reachable and have
INBOUND_EMAIL_SES_TOPIC_ARNset before you create or re-request confirmation.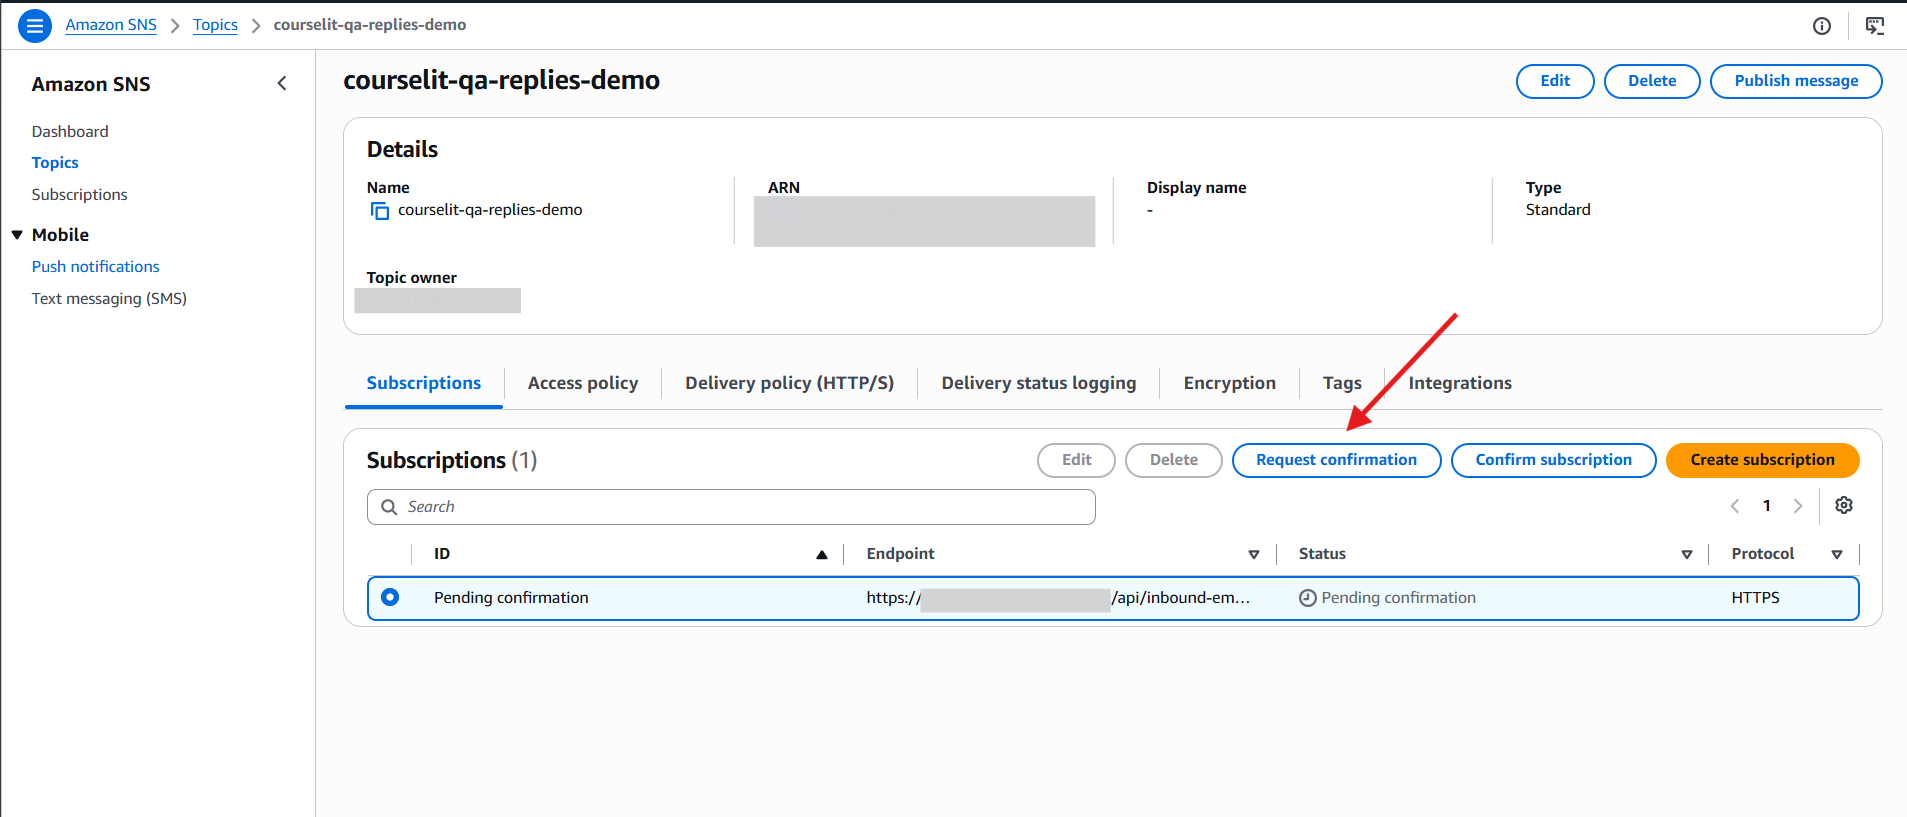
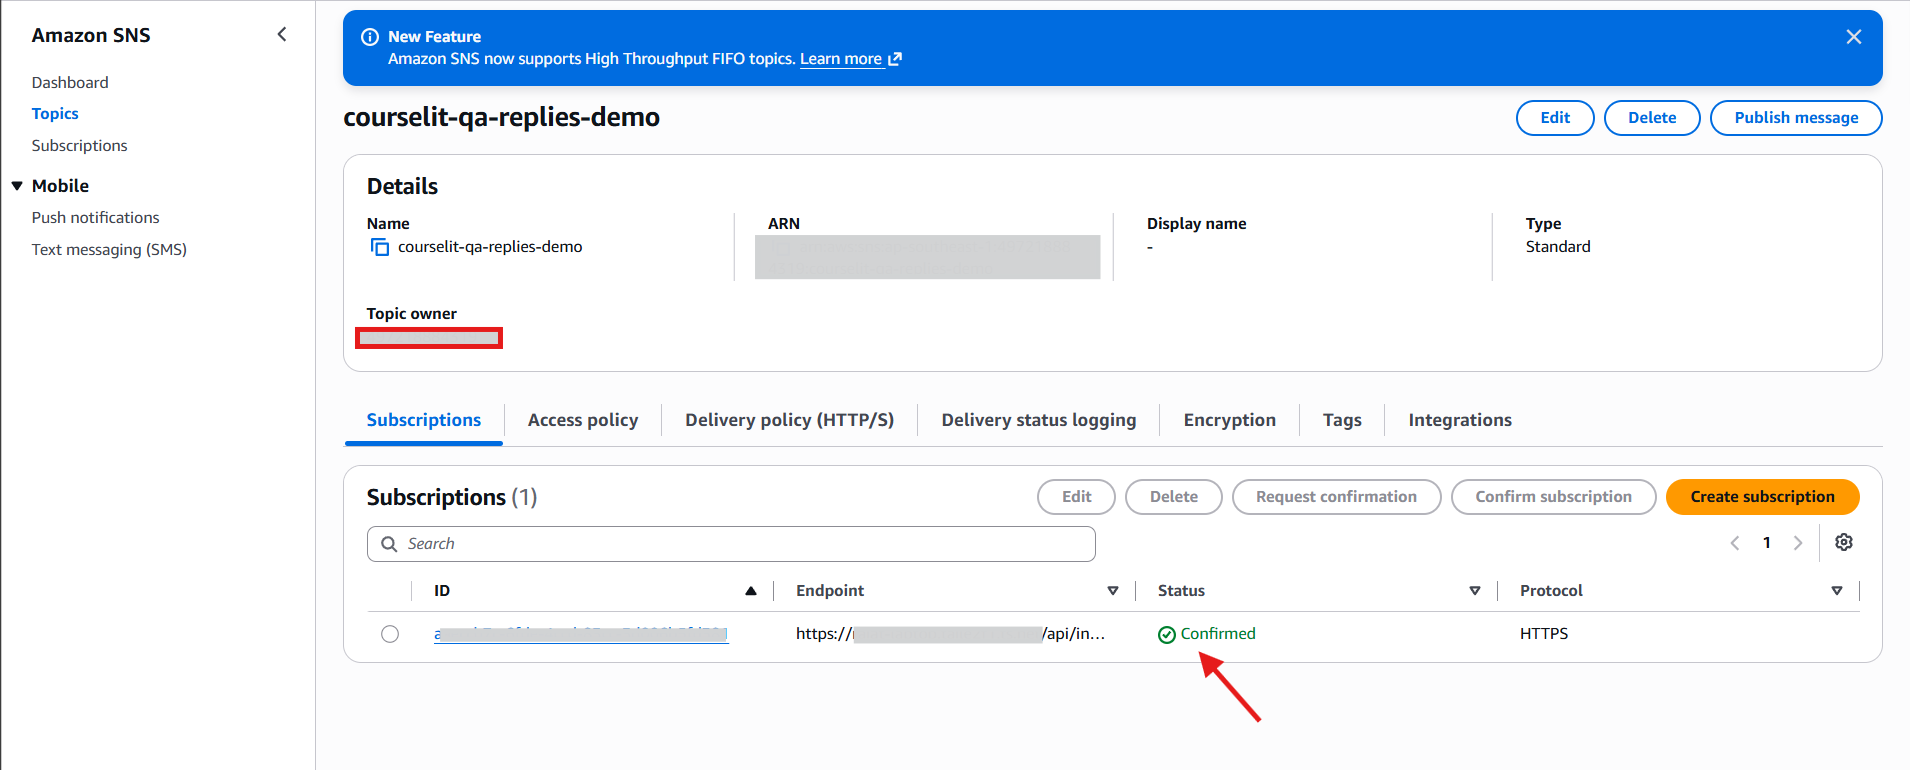
Refresh the page and verify that its status becomes Confirmed.
Finally, give the CourseLit web/app runtime permission to read the stored messages, and add a short S3 lifecycle expiry for the raw MIME prefix. CourseLit reads each object only while processing the webhook and does not need to retain raw email. The queue service does not need S3 permission. SES needs separate permission to write the selected prefix and publish to the topic; use the policies AWS generates in the SES and SNS consoles where possible.
The app checks SNS Signature Version 2, the AWS signing-certificate host, and the configured topic ARN before it reads the S3 object. It does not store message attachments.
Grant the web service access to the SES bucket
Use a workload IAM role rather than static AWS access keys. Attach this least-privilege policy to the role, replacing the bucket name and narrowing the object path to your configured prefix when one is used:
{
    "Version": "2012-10-17",
    "Statement": [
        {
            "Sid": "ReadInboundReplyEmails",
            "Effect": "Allow",
            "Action": "s3:GetObject",
            "Resource": "arn:aws:s3:::courselit-inbound-email/*"
        }
    ]
}- EC2 / Docker Compose: create an IAM role with the EC2 trusted entity and this policy. In the EC2 console, select the instance, then choose Actions → Security → Modify IAM role and attach the role. The AWS SDK in the web container uses the instance role's temporary credentials automatically.
- ECS / Fargate: create an IAM role with the Elastic Container Service Task trusted entity and this policy. Assign it as the task role for the web task definition. Do not use the task execution role, and do not assign this bucket-read permission to the queue task.
Do not set AWS_ACCESS_KEY_ID or AWS_SECRET_ACCESS_KEY in production when using a workload role. If the SES bucket uses SSE-KMS, also grant the web role kms:Decrypt for that KMS key.
Postmark
- Create a Postmark inbound server and add its MX records for
replies.example.comas described in Postmark's inbound setup guide. - Set its webhook URL to
https://courselit:<url-encoded-secret>@<your-app-host>/api/inbound-email/postmark. - Set
INBOUND_EMAIL_WEBHOOK_SECRETin the app service to that same secret. The username may be any non-empty value;courselitis used above for clarity. - Send a test message to the provider-generated inbound address. Postmark retries non-2xx responses, so do not disable the provider's retries.
CourseLit uses Postmark's StrippedTextReply when supplied, and otherwise removes quoted text from the plain-text body.
Mailgun
- Add
replies.example.comas a Mailgun receiving domain and publish the MX records Mailgun provides. - Create a Mailgun route that forwards matching mail to
https://<your-app-host>/api/inbound-email/mailgunusing theforward()action. See Mailgun's receiving-routes documentation. - Copy Mailgun's webhook signing key to
MAILGUN_WEBHOOK_SIGNING_KEYin the app service. - Keep the route payload as
multipart/form-dataor form data; CourseLit verifies Mailgun's timestamp, token, and HMAC signature before processing it.
Verify the setup
- Restart the app and queue services after changing environment variables.
- Trigger a Community or product-discussion notification. Inspect the delivered message headers: its
Reply-Toshould bereply+<opaque-token>@replies.example.com. - Reply from the same email address that received the notification. The reply should appear in the discussion and participants should receive the usual notifications.
- Try a different sender address. CourseLit accepts the webhook but silently discards that reply, so forwarded reply addresses cannot impersonate the original recipient.
Provider retries are idempotent: a received provider message ID is retained for 30 days, so retry delivery does not create duplicate comments.
To disable reply by email safely, remove INBOUND_EMAIL_DOMAIN from the queue service and restart it. New notifications will no longer include a Reply-To token; leave the app endpoint configuration in place until outstanding messages have expired or remove the provider route after the 30-day reply-token window.